What makes 402 different from 403
In agentic workflows, distinguishing between a permission error and a payment requirement prevents agents from getting stuck in infinite retry loops. The standard 403 Forbidden response signals that the server refused authorization, typically due to invalid or expired credentials. It is a hard security gate requiring identity resolution.
The 402 Payment Required response, however, indicates that the resource exists and the agent is authorized, but the transaction has not been settled. Unlike a 403, this is a billing state, not a security failure. Modern agentic protocols like x402 have standardized this code for machine-to-machine microtransactions, moving it from theoretical HTTP/1.1 reserved status to practical implementation.
This distinction dictates your error-handling logic. A 403 should trigger a credential refresh. A 402 should trigger a payment flow—such as initiating a crypto transaction—before the agent retries. Confusing the two leads to agents repeatedly hammering a server with unpaid requests, risking rate-limiting or permanent bans.
Set up the payment gateway and wallet
Before your API can accept payments, you need a wallet to store funds and a gateway to process transactions. This section covers creating a crypto wallet and configuring a payment gateway like Pay.sh or Nansen's x402 protocol.
Step 1: Create a dedicated crypto wallet
Set up a non-custodial wallet for this project. A standard hot wallet is sufficient for development.
- Choose a network: Select a blockchain with low fees and fast finality, such as Base, Polygon, or Ethereum Mainnet. L2 solutions are preferred to keep costs predictable.
- Secure the keys: Store your private key or seed phrase securely. You will need this to configure your backend server to verify incoming transactions.
- Fund the wallet (optional): Having a small amount of native gas tokens can help with gasless transaction patterns or bridging operations.
Step 2: Configure the payment gateway
Sign up for a payment gateway service. Services like Pay.sh or Nansen's x402 provide SDKs that simplify integration by monitoring the blockchain for your wallet address.
- Connect your wallet: Paste your wallet address into the gateway's configuration panel.
- Set pricing rules: Define fixed rates (e.g., $0.01 per request) or dynamic rates based on endpoint complexity.
- Configure webhook endpoints: Set up a webhook URL on your server. The gateway sends a POST request here when a valid payment is detected, allowing your server to update access status in real time.
Step 3: Implement the 402 response logic
Your API must check for payment proof before processing a request.
- Check for payment proof: If using x402, verify the signed message or transaction hash sent in the request headers against your wallet's public key.
- Fallback to gateway verification: If no proof is sent, query your payment gateway's API to check for recent, sufficient payments. This is less secure but easier for initial setups.
- Return 402 or 200: Return
200 OKif payment is verified. ReturnHTTP 402 Payment Requiredif not, signaling the client to pay.
Step 4: Test the flow end-to-end
Test the entire loop: send a request without payment to confirm the 402, make a test transaction, and verify that your webhook fires and subsequent requests return 200 OK.
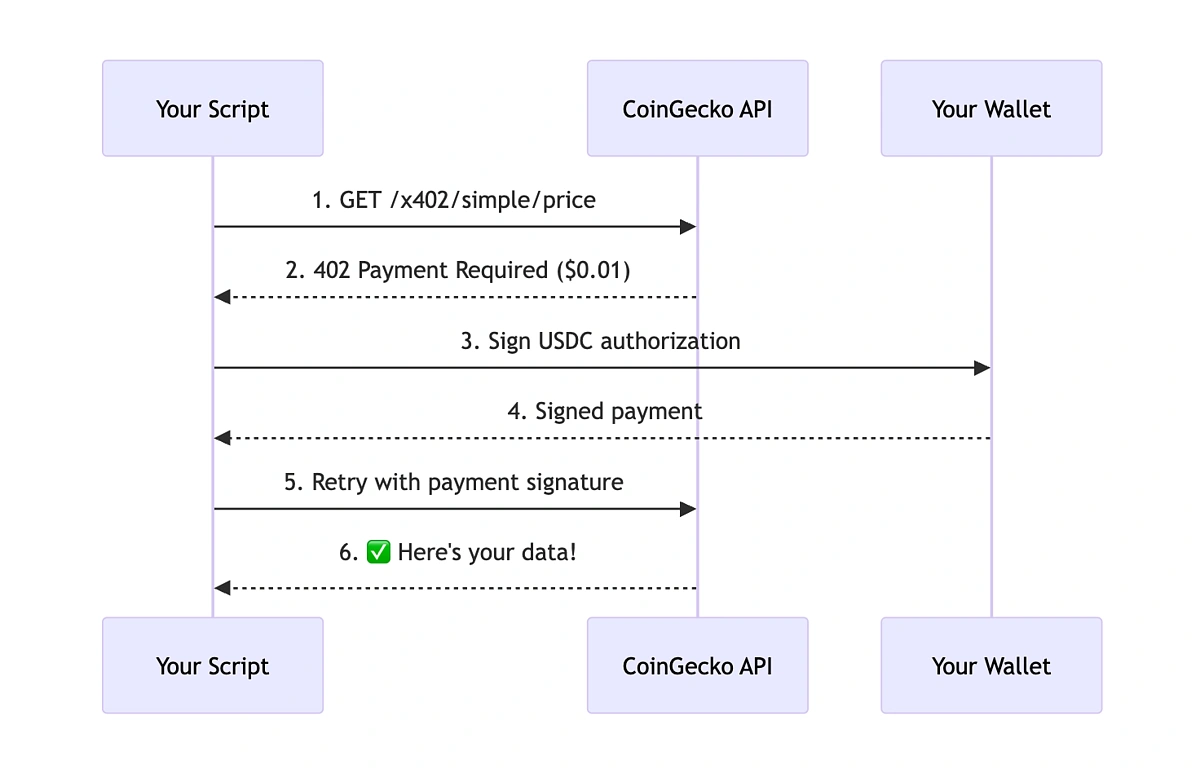
Embed pricing in 402 responses
The x402 specification requires the current price to be included in every 402 response. This allows agents to evaluate the cost and decide whether to proceed with the payment transaction.
Include a standard HTTP header like X-API-Price or X-402-Price in your response. Set the value to the cost of the requested resource in your chosen currency unit (e.g., USD). This header is the primary signal the agent uses to understand the financial requirement.
Alongside the header, include a JSON body that details the pricing logic. This should include the total amount, the currency code, and a brief description of what the payment covers. This structure helps agents verify the charge matches their internal expectations before initiating the blockchain transaction.
If your pricing varies based on usage, time, or agent reputation, ensure the price in the 402 response updates in real-time. Static pricing is easier to implement, but dynamic pricing requires your server to calculate the cost on every request. This flexibility allows you to offer discounts for high-volume agents or premium rates for urgent requests.
| Model | Price Handling | Best For |
|---|---|---|
| Static | Fixed rate per request | Simple, low-volume APIs |
| Dynamic | Calculated per request | High-volume or tiered pricing |
By embedding this data directly into the 402 response, you enable agents to automate payments without human intervention.
Handle failed payments and retries
A 402 status code is just the beginning. The most common triggers are insufficient funds, expired payment methods, or hitting a monthly quota cap.
Distinguish between transient and hard errors
Do not treat every failure the same. If the payment gateway is experiencing a brief outage, your request might fail with a generic 500 or a timeout. These are transient; retry them with a delay. A 402 is a hard stop. It means the resource is locked until the ledger is updated.
Check the response body for specific billing codes. If the error says "exceeded monthly quota," a retry will not help. The agent must either wait for the cycle to reset or trigger an upgrade flow.
Implement a retry loop with backoff
For transient errors, use exponential backoff. Start with a short delay, then double it for each subsequent attempt. Limit the number of retries to three or four. If the payment system is still down after that, fail gracefully and log the issue for human review.
Update payment methods proactively
Integrate a webhook listener for payment method expiration events. When a card is about to expire, prompt the user to update it before the next billing cycle. If a payment does fail, notify the user immediately via email or in-app message.
Verify transactions and track usage
Relying on a successful HTTP 200 response isn't enough; you must verify the blockchain transaction to ensure funds are settled before granting access. This prevents "zombie" requests where the API returns data but the payment never clears.
For tracking usage, log every API call with a unique request ID. This creates an immutable audit trail that links specific tokens to specific actions. If a dispute arises, you can trace exactly which call triggered the charge and whether the payment was confirmed on-chain.
Common questions about 402 payments
When implementing these flows, ensure your error handling logic specifically targets the 402 code rather than treating it as a generic network failure.
No comments yet. Be the first to share your thoughts!