What is HTTP 402 payment required
The HTTP 402 status code is the foundational protocol for machine-to-machine payments. Originally reserved for future digital cash systems, it signals that a client must pay before accessing a resource. Today, it serves as the standard signal for the x402 protocol, enabling automated, cryptographically verified transactions without human intervention.
The Standard
According to the MDN Web Docs, HTTP 402 is a "nonstandard response status code reserved for future use." It was designed specifically to facilitate micropayments and digital cash systems. While rarely used in traditional web browsing, its semantics align perfectly with API monetization: the server refuses service until payment is confirmed.
x402 and Agentic Payments
The x402 protocol operationalizes this reserved code for the crypto economy. It embeds payment instructions directly into the HTTP response, allowing autonomous agents to pay USDC or other stablecoins seamlessly. When an API returns a 402 with an x402 payload, it provides a machine-readable path to settle the transaction, turning every API call into a potential revenue stream.
Set up the x402 payment gateway
To monetize your API with x402, you need to configure your server to intercept requests and respond with an HTTP 402 status code instead of the usual 200 OK. This status code, originally reserved for future digital cash systems, signals to the client that payment is required to access the resource. By returning 402, you pause the request and provide metadata about the price and payment terms.
The x402 protocol simplifies this by handling the complex handshake between your server, the client, and a USDC payment facilitator. Your server's job is to define which endpoints are paid, set their prices, and return the correct headers. Once configured, the client library automatically handles the signing and verification of USDC payments.
1. Install the x402 middleware
Start by adding the x402 library to your project. This middleware wraps your existing API routes and injects the payment logic without requiring you to rewrite your core business logic. For most Node.js environments, you can install it via npm:
npm install @x402/middleware
2. Configure your API routes
Wrap your protected endpoints with the x402 middleware. You will need to specify the price for each endpoint in USDC. The middleware will automatically intercept requests to these routes and return a 402 response if no valid payment proof is present.
import { x402 } from '@x402/middleware';

app.get('/api/data', x402({ price: 0.01 }), (req, res) => {
  res.json({ data: 'protected content' });
});
3. Define payment metadata
When the server returns a 402, it must include specific headers that tell the client how much to pay and to whom. These headers include the price in USDC, the wallet address to receive the payment, and a unique transaction ID. The x402 library handles most of this, but you can customize the metadata if you need specific payment terms or expiration times.
4. Test the payment flow
Before going live, test the flow using a local development environment. Send a request to your API and verify that you receive a 402 response. Then, use a test wallet to simulate the payment. The x402 facilitator will verify the transaction, and your server should then grant access to the resource.
Add the x402 library to your project dependencies using your package manager. This provides the core functions needed to intercept requests and handle payment logic.
Apply the x402 middleware to specific routes. Define the price in USDC for each endpoint. The middleware will automatically return a 402 status code for unpaid requests.
Test the integration by sending a request. Confirm the 402 response includes correct price and wallet headers. Simulate a payment using a test wallet to ensure the facilitator verifies the transaction and grants access.
-
Install the x402 npm package
-
Configure middleware with protected routes
-
Set USDC prices for each endpoint
-
Test 402 response with unpaid request
-
Verify payment verification flow
Configure the agent wallet and USDC integration
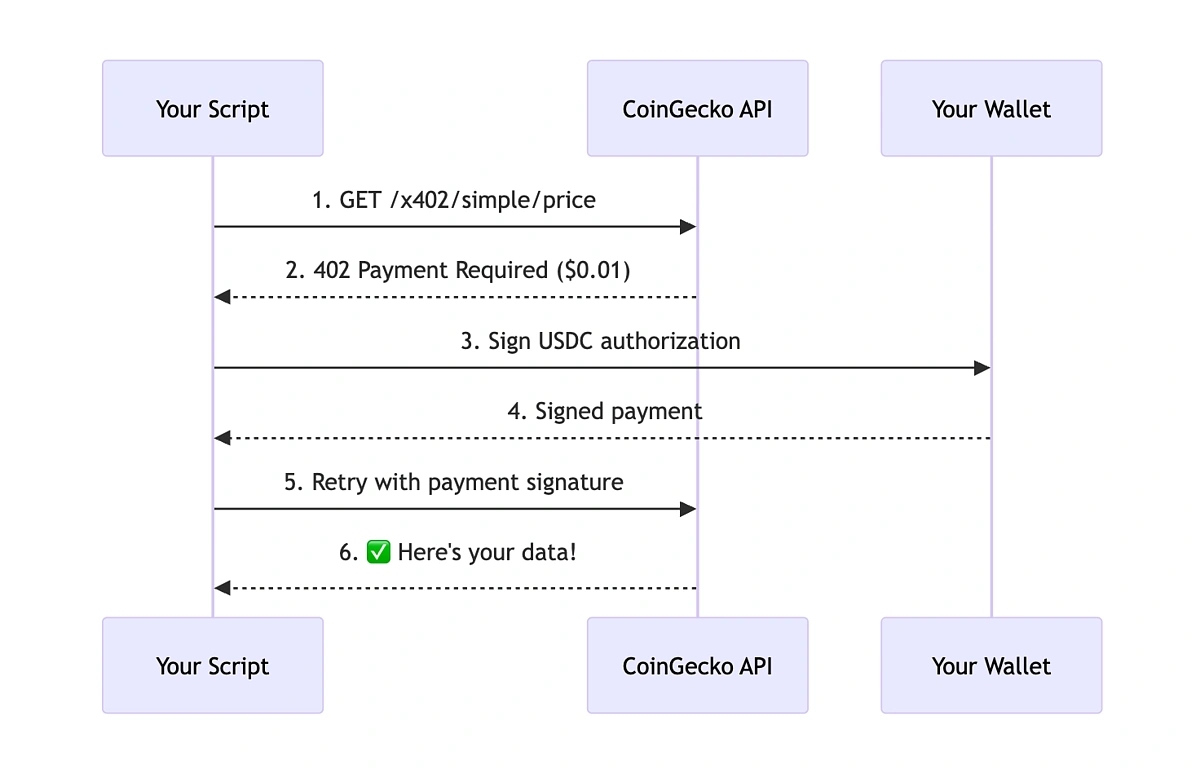
To fulfill the 402 requirement, your AI agent needs a configured wallet and a way to handle USDC transactions. The x402 protocol automates most of the heavy lifting, but you must ensure the client can sign transactions and verify the payment requirements sent by the server. This section walks you through the exact sequence your agent will follow to pay for API access.
The process relies on the server returning a 402 Payment Required status code. This response isn't just an error; it's a payment instruction. It contains the price, the wallet address, and the cryptographic challenge the agent must sign. Your agent must be programmed to recognize this status, parse the payment details, and execute the transaction before retrying the original request.
Detect the 402 response and extract payment details
When the agent sends a request, the server responds with a 402 status. The agent must parse the response headers to find the payment instructions. According to the x402 specification, the server includes the current price and the wallet address in the response headers. The agent should log this event and prepare to construct a payment transaction.
When the agent receives a 402 status, it should immediately halt further processing of the response body. Instead, it parses the x-payment-amount and x-payment-wallet headers. These headers tell the agent exactly how much USDC is needed and where to send it. If these headers are missing, the request is likely malformed or the server doesn't support x402, so the agent should throw an error.
Using the extracted wallet address and amount, the agent constructs a USDC transfer transaction. It signs this transaction with its private key. The signature proves that the agent owns the funds and authorizes the payment. The agent must ensure the transaction includes the correct network parameters (e.g., Ethereum, Polygon, Base) to avoid failed transfers.
Once the transaction is signed and broadcast to the blockchain, the agent waits for confirmation. After the payment is verified, the agent resends the original API request. This time, it includes the transaction hash or signature in the headers to prove payment. The server verifies the payment and returns the requested data with a 200 OK status.
Handle transaction failures and retries
Blockchain transactions can fail due to insufficient gas, network congestion, or incorrect wallet addresses. Your agent needs a robust error handling strategy. If a transaction fails, the agent should log the error and retry with a small delay. It should also check the current gas prices to ensure the transaction is prioritized.
If the payment is successful but the server doesn't recognize it, the agent should include the transaction hash in the retry request. This allows the server to verify the payment on-chain. Most x402-compatible servers will check the transaction hash against the blockchain to confirm the payment before returning the data.
Verify the payment before accessing the API
Before the agent considers the payment complete, it should verify the transaction on the blockchain. This step ensures that the funds have actually reached the server's wallet. You can use a block explorer API to check the transaction status. If the transaction is pending, the agent should wait before retrying the API request.
This verification step adds a layer of security, ensuring that the agent doesn't proceed with the API call until the payment is confirmed. It also helps prevent issues where the payment is sent but the server hasn't yet processed it, which could lead to duplicate charges or failed requests.
Check your wallet balance
Before integrating x402, ensure your agent's wallet has enough USDC to cover the API costs. You can check the balance using a block explorer or a wallet API. Keep a small buffer to account for gas fees and potential price fluctuations.
Test with a sandbox environment
Always test your x402 integration in a sandbox environment before deploying to production. This allows you to verify the payment flow without risking real funds. Most x402 providers offer testnet environments for this purpose.
Monitor transaction costs
Keep an eye on gas fees and transaction costs. If the API calls are frequent, the cumulative cost of gas fees can add up. Consider using Layer 2 networks to reduce costs.
Key Takeaways
Troubleshooting common issues
If you encounter issues with x402 integration, check the following:
- Ensure the wallet is correctly configured and funded.
- Verify that the server is returning valid 402 headers.
- Check the blockchain network for pending transactions.
- Review the agent's error logs for specific failure messages.
By following these steps, you can successfully integrate x402 into your AI agent, enabling seamless pay-per-API access with USDC payments.
Handle common 402 payment errors
Even with a solid x402 implementation, payment failures happen. When a client receives a 402 status, it usually means the signature is invalid, the wallet balance is too low, or the header format is malformed. Here is how to troubleshoot the three most frequent integration issues.
Fix expired or invalid signatures
The most common cause of a 402 error is a signature that has passed its validity window. x402 relies on cryptographic proofs that expire after a set time. If the client’s clock is off or the server’s validation window is too tight, the payment proof is rejected.
Check your client-side timestamp against the server. Ensure the signature payload matches the request body exactly; even a minor whitespace difference invalidates the proof. If you are using a library, verify that the expiration time is set far enough in the future to account for network latency.
Check for insufficient funds
A 402 response also signals that the client’s wallet lacks the required USDC balance. This is not a network error; it is a business logic check. Before the request is sent, the client should verify the balance against the expected price defined in the Pay header.
If the balance is low, the client must trigger a top-up flow. Do not retry the same request immediately; it will fail again. Instead, guide the user to add funds, then retry. This prevents unnecessary load on your API and keeps the user experience clear.
Validate header format
Incorrect header formatting breaks the x402 verification process. The Pay header must follow the strict syntax defined by the spec. A missing parameter or a malformed URI will cause the server to reject the payment proof as invalid.
Use a linter or a test suite to validate headers before deployment. Common mistakes include omitting the currency field or using an unsupported network identifier. Ensure the header is sent as a single line and that all values are URL-encoded correctly.
Comparison: x402 Pay-Per-Call vs. Subscription Billing
Choosing between x402 and traditional subscriptions depends on whether your API is used by humans or autonomous agents. Subscription models work well for predictable, high-volume enterprise usage, but they introduce friction for machine-to-machine interactions. x402 enables microtransactions directly in the HTTP response stream, allowing agents to pay only for what they consume without managing invoices or credit cards.
The following table compares the operational mechanics of both approaches for AI agent workloads.
| Feature | x402 Pay-Per-Call | Monthly Subscription | Agent Fit |
|---|---|---|---|
| Billing Trigger | Per successful API call | Fixed monthly cycle | High |
| Payment Method | USDC via Tangle | Credit card / ACH | x402 wins |
| Overage Handling | Automatic payment on 402 | Manual upgrade or block | x402 wins |
| Integration Effort | HTTP header + wallet | Dashboard + billing API | x402 simpler |
| Cost Predictability | Variable per request | Fixed monthly fee | Subscription wins |
For AI agents, x402 removes the need for a billing dashboard. As noted by Tangle, agents need a 402 response they can programmatically respond to, not a human-readable invoice. This makes x402 the superior choice for autonomous systems that require seamless, machine-readable payment flows.
FAQ about HTTP 402 and API pricing
What is the 402 Payment Required status code?
HTTP 402 is a reserved status code originally intended for digital payment systems. Unlike 401 (Unauthorized) or 403 (Forbidden), which signal authentication issues, 402 explicitly tells the client that payment is needed before access is granted. In the context of x402, this code triggers the payment flow, signaling to the API consumer that they must pay before the response body is delivered.
How does x402 handle pricing updates?
The x402 protocol embeds the current price directly into the 402 response header. This means your agent or client sees the exact cost before committing to the payment. This transparency prevents surprise charges and allows dynamic pricing models where rates adjust based on demand or usage volume in real-time.
How should I calculate API pricing for pay-per-use models?
For pay-per-API implementations, pricing typically relies on transaction volume or data volume rather than fixed subscriptions. You can charge based on the number of calls made or the gigabytes of data processed. Combining this with a revenue-share model for specific endpoints can align your incentives with the end user's success, ensuring fair compensation for high-value computations.
Helpful gear
Use these product recommendations as a starting point, then choose the size, material, and price point that fit how you actually use the gear.



As an Amazon Associate, we may earn from qualifying purchases.
No comments yet. Be the first to share your thoughts!