What HTTP 402 Means for APIs
The HTTP 402 status code is a payment instruction, not a permission error. When a client makes an API request, a 402 Payment Required response signals that the server is ready to fulfill the request but requires a transaction first. This status code was reserved in the original web specifications for a micropayment layer that never fully materialized, but it remains the most logical signal for agentic commerce.
This distinction is critical for building agentic payment workflows. Autonomous agents need to distinguish between a security block and a billing requirement. If an agent encounters a 402, it should trigger a payment process rather than a security audit. This allows for seamless, machine-to-machine transactions where the API itself enforces the pricing model.
While many modern platforms handle billing at the gateway level (returning 200 OK after payment), using 402 explicitly in the application layer can simplify logic for agents that need to make granular decisions about resource value. As noted by industry analyses, this code represents a "forward-looking bet" on native protocol payments, making it a relevant tool for future-proofing agentic systems that operate at scale.
Set up the x402 payment protocol
The x402 protocol turns an API into a self-billing endpoint by embedding the price directly in the HTTP response. Instead of relying on static configuration, the server tells the agent exactly how much to pay for the current request. This ensures your revenue updates in real time as market conditions change.
Configure the middleware
Start by installing the x402 middleware for your server framework (Node.js, Python, or Go). This middleware intercepts incoming requests and checks for valid payment signatures before processing the payload. It acts as the gatekeeper, ensuring no agent can bypass the payment layer.
Embed the price in the response
When an agent calls your API without payment, the middleware returns an HTTP 402 status code. Crucially, this response includes the current price in the headers or body. As noted by AgentCash, "The x402 protocol includes the current price in every 402 response. Your agent sees the updated price before paying." This allows the agent to fetch the latest rate, authorize the payment, and retry the request automatically.
Test with a simulation
Use a local wallet or a testnet environment to verify the flow. Send a request without payment to confirm the 402 response and price embedding. Then, simulate a payment to ensure the agent can parse the price, authorize the transaction, and successfully access the API data. This step validates that your pricing logic is correctly integrated into the response cycle.
Integrate agents with wallet logic
When an API returns a 402 status, the agent must treat it as a payment instruction, not an error. The x402 protocol embeds the exact price and payment address in the response headers. Your agent parses these headers, signs a transaction using its connected wallet, and retries the request automatically.
This loop allows agentic workflows to handle micropayments without human intervention. Below is the standard task sequence for building this logic.
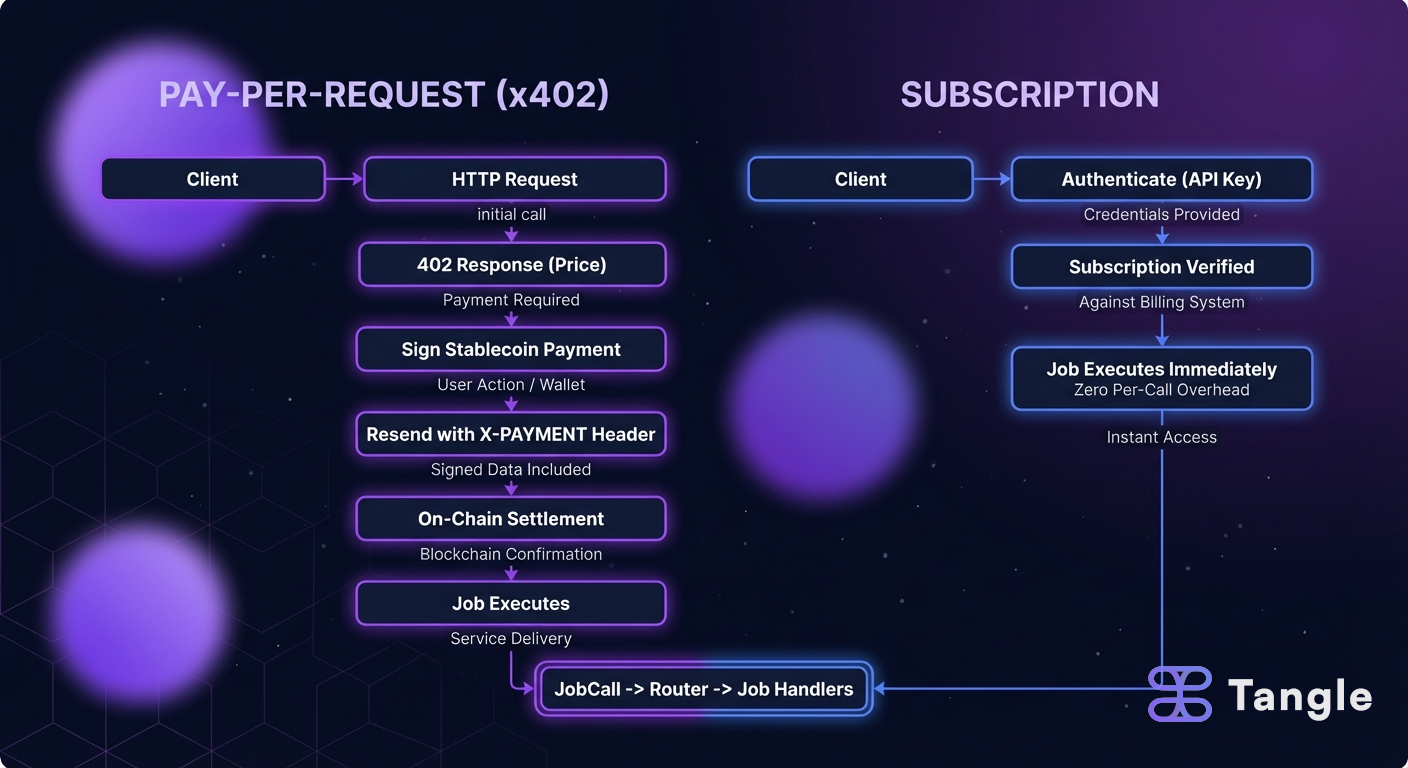
The agent intercepts the 402 response and extracts the x-pay or similar header fields. These fields contain the required token amount (e.g., USDC) and the recipient wallet address. The agent reads the current price dynamically, as rates can change between requests.
The agent must have access to a non-custodial wallet that supports the payment chain (usually Ethereum, Polygon, or Solana). It uses a private key or hardware security module (HSM) to authorize transactions. Ensure the wallet holds sufficient balance for the estimated payment plus network gas fees.
Using a library like ethers.js or web3.py, the agent constructs a transaction to the recipient address with the exact amount from the headers. It signs the transaction with the wallet’s private key and broadcasts it to the mempool. The agent should wait for a single block confirmation to ensure the payment is valid before proceeding.
Once the transaction is confirmed, the agent attaches the transaction hash (TXID) or a cryptographic receipt to the headers of the retried request. It sends the original payload again. The API validates the payment proof and returns the requested data or action result as a 200 OK.
If the transaction fails due to insufficient funds or network congestion, the agent should pause and log the error. Implement a retry limit (e.g., 3 attempts) before alerting a human operator. Never retry indefinitely, as this can lead to excessive gas costs or API rate-limiting.
This workflow turns the HTTP 402 status code into a functional payment gateway. By automating the parse-pay-retry cycle, your agents can consume pay-per-API services seamlessly, paying only for the value they actually use.
Compare pricing models for APIs
Choosing between pay-per-request, subscription, and seat-based pricing depends on how your users access the API. Pay-per-request charges a fixed rate per call, making costs predictable for sporadic or machine-to-machine usage. Subscriptions offer tiered access for consistent volume, while seat-based models charge per user identity, which can become expensive for automated agents.
Use the comparison below to match your usage pattern to the right model. If your workload is irregular, pay-per-request avoids the sunk cost of unused credits. If usage is steady and high-volume, subscriptions often provide better margins. Seat-based pricing is rarely suitable for agentic workflows where multiple bots may share a single developer account.
| Model | Cost Structure | Predictability | Best For |
|---|---|---|---|
| Pay-per-request | Fixed fee per call | High | Sporadic usage, M2M |
| Subscription | Monthly tiered fee | Medium | Steady, high volume |
| Seat-based | Per-user license | Low | Human-only teams |
For detailed breakdowns of how each model tracks value and cost, refer to Stripe’s guide on API call pricing. This helps clarify why simple multiplication of calls by rate works for pay-per-request but fails for complex, multi-user environments.
Fix common integration errors
Agentic workflows break when payment infrastructure doesn’t match the speed of autonomous decision-making. A single misconfigured wallet or unchecked retry loop can drain funds or trigger infinite loops before a human can intervene. These three pitfalls are the most common causes of failure in pay-per-API deployments.
1. Validate wallet and billing onboarding
Agents often attempt to call APIs before the billing layer is fully active. Ensure that your application has completed the full billing onboarding process for the provider. For example, Microsoft Graph API requires explicit billing onboarding before any calls are permitted. If the wallet is empty or the subscription limits haven’t been evaluated, the agent will receive a 402 error immediately. Check the provider’s developer console to confirm that the payment method is verified and the quota is set before deploying the agent.
2. Handle price volatility with buffers
API pricing models often charge per call, meaning the total cost is simply the number of calls multiplied by that rate. However, provider rates can change, or dynamic pricing may apply based on load. If your agent calculates its budget based on static historical costs, it may run out of funds mid-task. Build a buffer into your agent’s financial logic. Always fetch the current price from the API’s pricing endpoint before committing to a high-volume task, rather than relying on cached values.
3. Prevent infinite retry loops
When an agent encounters a 402 Payment Required error, a naive retry strategy will loop forever, burning through credits. You must implement a hard stop condition. If the payment fails, the agent should log the error, alert the human operator, and halt execution. Do not allow the agent to retry payment verification automatically unless you have a pre-approved, capped microtransaction flow. This prevents the "zombie agent" problem where an autonomous system drains a wallet in seconds due to a configuration error.
Check your API billing setup
Before routing production traffic, verify that your 402 infrastructure is secure and auditable. A misconfigured payment gateway leaves you exposed to fraud or silent revenue loss. Use this final checklist to ensure your billing onboarding is complete and your agents can pay without friction.
-
Confirm payment gateway webhooks are signed and verified. Use official documentation from your provider (e.g., Stripe or Coinbase) to validate signatures.
-
Test the 402 response with a real agent wallet. Ensure the agent sees the price and can submit a valid payment before the request is fulfilled.
-
Verify rate limiting is active. Prevent API abuse by setting caps on requests per minute per wallet address.
-
Check logging and observability. Ensure every 402 and 200 response is logged with transaction IDs for easy auditing.
-
Review error handling. Ensure your API returns clear 402 errors with the price included, so agents can retry or abort gracefully.
No comments yet. Be the first to share your thoughts!