Set up the x402 payment endpoint
Build Pay-Per-API 402 Infrastructure for AI Agents works best as a sequence, not a scramble through settings. Do the minimum first: confirm compatibility, connect the core hardware, update only when needed, and test the result before adding optional features. That order keeps the task understandable and makes failures easier to isolate. After each step, pause long enough for the interface to finish syncing. Many setup problems are timing problems disguised as configuration problems. If the same step fails twice, record the exact error, restart the smallest affected piece, and retry before moving deeper.
Configure stablecoin settlement on Base
Stripe’s recent launch of Machine Payments (x402) has made it possible to charge AI agents directly using USDC on the Base blockchain. This integration removes the friction of traditional credit card processing for micropayments. Instead of waiting for daily settlements or paying high interchange fees, your API can accept instant, sub-cent transactions.
The primary advantage of using Base for x402 is the cost structure. Ethereum L1 gas fees are often too high for small API calls, but Base offers a low-cost, high-throughput environment. This makes it feasible to charge fractions of a cent per request without the transaction fee exceeding the payment itself. The x402 protocol handles the verification of payment on-chain before granting access to your API endpoint.
To set this up, you need to configure your API to verify USDC transfers on the Base network. This involves integrating an x402-compatible wallet or payment gateway that can listen for on-chain events. Once configured, your API will check for a successful payment signature before returning the requested data or service.
By leveraging Base for settlement, you enable a new class of autonomous economic interactions. AI agents can now pay for data, compute, or services on-demand, creating a fluid economy for machine-to-machine transactions. This infrastructure is essential for building scalable, automated AI services that don't rely on human-initiated billing cycles.
Verify the nonce to prevent replay attacks
The nonce is the single most important security component in x402. Without it, an attacker can intercept a valid payment response and replay it indefinitely, effectively draining your API’s value for free. In the x402 protocol, the nonce ensures that each payment transaction is unique and can only be executed once.
When your API receives a request, it must validate the nonce before processing the payment. This validation is not optional; it is the core defense against replay attacks. The nonce typically takes the form of a UUID or a timestamp-based string that the client includes in the x-payments-nonce header.
Here is how you should implement this check in your backend logic:
- Extract the nonce: Read the
x-payments-nonceheader from the incoming request. - Check for duplicates: Query your database or cache (like Redis) to see if this nonce has already been processed.
- Mark as used: If the nonce is new, immediately mark it as processed. Use a short TTL (Time To Live) if you are using a cache, but for high-security environments, a permanent record in your database is safer.
- Reject duplicates: If the nonce already exists, reject the request with a
402 Payment Requiredstatus and a clear error message indicating the nonce was already used.
if (await isNonceUsed(nonce)) {
  return new Response('Nonce already used', { status: 402 });
}
await markNonceAsUsed(nonce);
This simple check transforms your API from a vulnerable endpoint into a secure, payment-ready service. By enforcing nonce uniqueness, you ensure that every credit charged corresponds to exactly one service call.
For more details on the x402 specification and nonce handling, refer to the official x402 documentation.
Calculate pricing for sub-cent transactions
Build Pay-Per-API 402 Infrastructure for AI Agents works best as a clear sequence: define the constraint, compare the realistic options, test the tradeoff, and choose the path with the fewest hidden costs. That order keeps the advice usable instead of decorative. After each step, pause long enough to check whether the recommendation still fits the reader's actual situation. If it depends on perfect timing, unusual access, or a best-case budget, include a simpler fallback.
| Factor | What to check | Why it matters |
|---|---|---|
| Fit | Match the option to the primary use case. | A good deal still fails if it does not fit the job. |
| Condition | Verify age, wear, and service history. | Hidden condition issues erase upfront savings. |
| Cost | Compare purchase price with likely upkeep. | The cheapest option is not always the lowest-cost option. |
Test the payment flow with an AI agent
Before scaling, you need to verify that your agent can handle the 402 response code without crashing or hanging. The goal is to ensure the agent parses the payment instruction, initiates the transaction, and retries the request only after success.
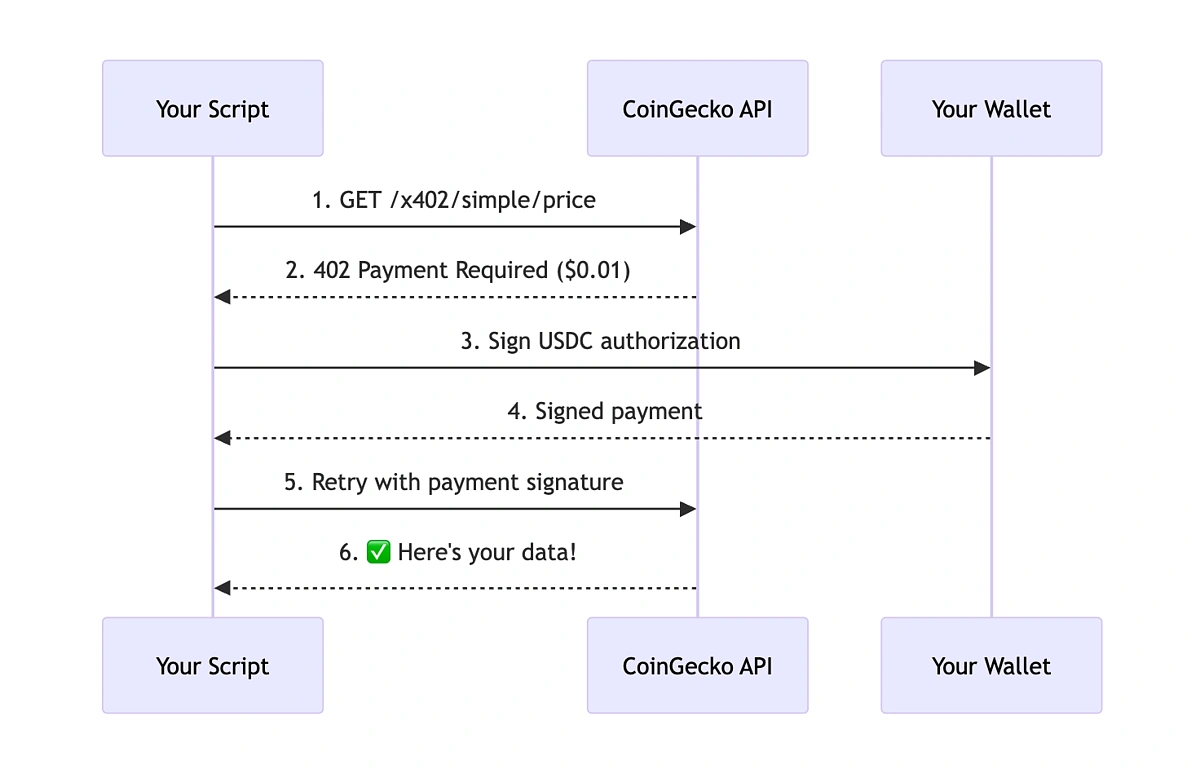
Use a mock server or a local proxy to intercept your API calls and return a 402 Payment Required status. Include the Pay header with a valid crypto payment URI. This forces the agent to encounter the payment gate in a controlled environment.
Check your agent’s error handling middleware. It must recognize the 402 status and extract the payment details from the headers. If the agent treats this as a generic network error, the flow fails. Ensure it logs the payment URI for the next step.
Trigger the payment from the agent’s wallet. Use a testnet or a low-value transaction to confirm the funds move correctly. The agent should wait for blockchain confirmation before proceeding. Do not proceed to the retry phase until the transaction is settled.
Once payment is confirmed, the agent should retry the original API call. The server must now return a 200 OK with the requested data. If the server still returns 402, check your payment verification logic and blockchain indexer latency.
Frequently asked questions about x402
These answers address the most common implementation hurdles and cost questions for developers building pay-per-API infrastructure with x402.
No comments yet. Be the first to share your thoughts!