What is HTTP 402 for API payments
HTTP 402 is the reserved status code for "Payment Required." For decades, it sat unused in the HTTP/1.1 specification, a placeholder waiting for a payment infrastructure mature enough to support it. The Mozilla Developer Network notes that this code was originally intended to enable digital cash or micro-payment systems, but it remained a theoretical concept while the web moved toward subscription models and ad-supported content.
Today, HTTP 402 is the standard for micropayments in agentic workflows. As AI agents begin to transact autonomously, the friction of manual billing becomes a bottleneck. A 402 response allows a server to reject an API request until payment is settled, enabling seamless, machine-to-machine commerce without human intervention.
This approach differs fundamentally from legacy billing models. Traditional API gateways typically charge a flat monthly fee or a tiered subscription, requiring developers to manage keys and quotas manually. With 402, payment is part of the protocol. Each request is evaluated against a payment status, allowing for granular, pay-per-use pricing that scales with actual consumption rather than estimated capacity.
Configure your endpoint for 402 responses
Setting up x402 payment requirements means teaching your API to speak the language of digital cash. Instead of silently rejecting unpaid requests, your server proactively tells the client exactly what it owes.
The x402 protocol uses the HTTP 402 Payment Required status code to signal that a resource is locked behind a paywall. When a client hits your endpoint, your server responds with this status code, embedding the current price and wallet details directly in the headers. This allows agents to see the updated cost before they pay, ensuring you get paid instantly for every request.
Here is how to configure your endpoint to return these payment instructions.
Start by identifying the API endpoint you want to monetize. In your server code, intercept requests to this route. Instead of returning a standard 200 OK or 401 Unauthorized, you will prepare a 402 response. Decide on your pricing model—whether it is a flat fee per call or a variable rate based on data volume—and store this value in your configuration. This price is what the client will see in the response headers.
When a request hits your endpoint, set the HTTP status code to 402. This is the core signal of the x402 protocol. Along with the status code, you must include specific headers that tell the client where to send payment. These headers typically include the wallet address for receiving USDC and the exact amount due. By embedding these details in the response, you remove the need for the client to guess how to pay you.
Your server should return a body that contains the payment requirements. This payload includes the transaction details, such as the recipient wallet, the asset type (usually USDC), and the amount. The client or agent uses this information to construct a signed payment transaction. Once the payment is verified by the facilitator or blockchain network, the client can retry the request to access the data.
How AI agents parse 402 responses
When an AI agent hits a pay-per-API endpoint, the server doesn't just block the request—it negotiates. The x402 protocol embeds payment instructions directly into the HTTP response, turning a standard error into a transactional handshake. The agent receives a 402 status code containing the price, the wallet address, and the specific token required (usually USDC on a low-fee chain like Base or Solana).
The client library intercepts this response before the application crashes. It extracts the payment payload, checks the agent's balance, and prepares a signed transaction. This happens in milliseconds, allowing the agent to pay for compute or data without human intervention. The process relies on the agent having a funded wallet and the necessary permissions to sign transactions.
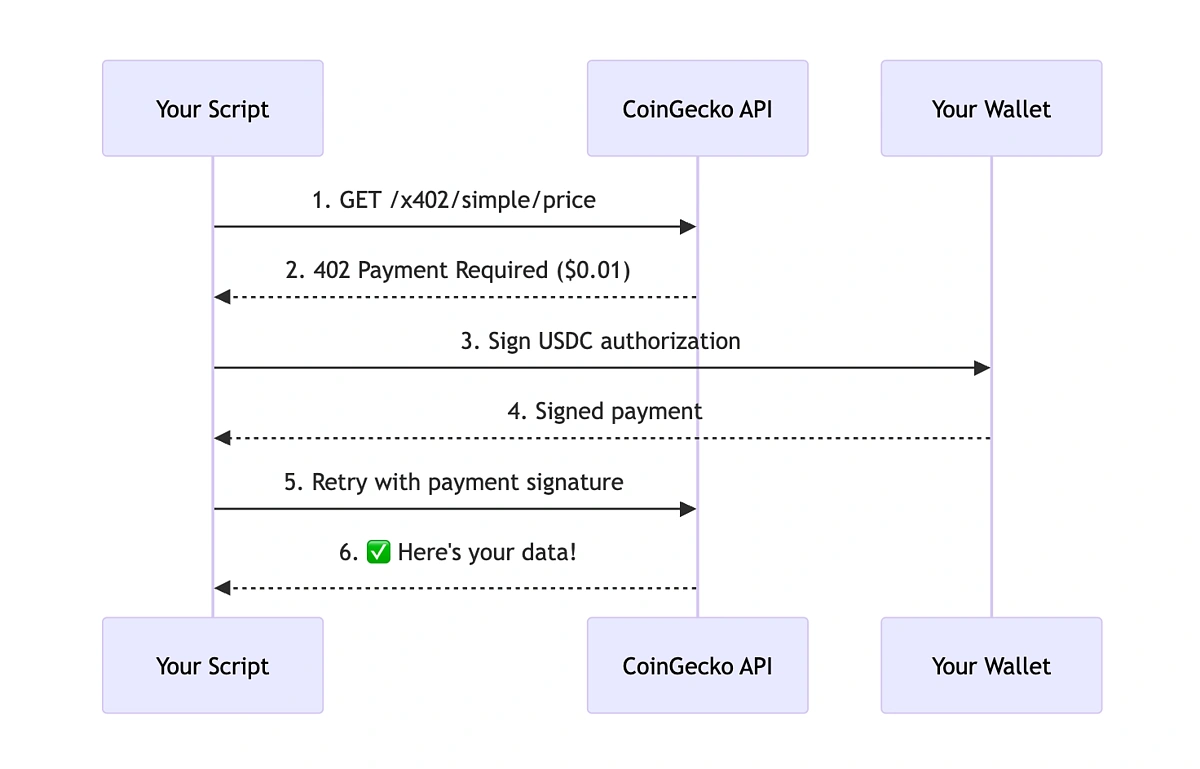
The server responds with HTTP 402 instead of 200. The response body includes the x-pay header or JSON payload detailing the cost, the recipient wallet address, and the chain ID. The agent's HTTP client catches this error state and routes it to the payment handler rather than throwing a generic network error.
Before spending funds, the agent verifies the price against its budget constraints. It checks if the requested USDC amount is within its available balance. If the balance is insufficient, the agent may abort the request or switch to a cheaper provider if one is available in its routing logic.
The client library constructs a USDC transfer transaction to the specified wallet address. It signs this transaction using the agent's private key (stored securely in a vault or keychain) and broadcasts it to the blockchain. The agent waits for the transaction to reach a minimum number of confirmations.
Once the transaction is confirmed on-chain, the agent sends a retry request to the original API endpoint. This time, it includes a proof-of-payment header or token. The server verifies the payment hash, and if valid, returns the requested data with a 200 OK status.
The key to this workflow is automation. Agents don't "decide" to pay in a human sense; they execute predefined logic based on the 402 signal. This allows for micro-transactions that were previously too expensive to process manually. By integrating an x402 client library, your infrastructure can handle these payments seamlessly, turning every API call into a potential revenue stream.
Compare pricing models for APIs
Choosing the right monetization model depends on your infrastructure's usage patterns and your risk tolerance. Pay-per-API 402 sits between traditional subscriptions and token-based crypto payments, offering granular control but requiring different integration logic.
The following comparison highlights the trade-offs between these three common approaches. Use this table to identify which model aligns with your specific developer experience and revenue goals.
| Model | Flexibility | Cost Predictability | Integration Complexity |
|---|---|---|---|
| Subscription | Low | High | Low |
| Pay-per-API 402 | High | Medium | Medium |
| Token-based | Very High | Low | High |
Subscription models work best for stable, predictable workloads where developers prefer budget certainty over per-call granularity. Pay-per-API 402 shines in volatile environments or agent-driven workflows where the price updates dynamically with every request, ensuring you are paid the current market rate rather than a stale tier fee. Token-based pricing offers the highest flexibility for cross-border or decentralized use cases but introduces significant complexity regarding wallet management and price volatility for both you and your users.
For most Web3 infrastructure providers, the 402 protocol offers a middle ground: it retains the simplicity of per-action billing while leveraging blockchain transparency to handle payment verification without the overhead of traditional payment processors.
Common 402 integration errors
Even with a solid payment rail, integration mistakes can block revenue. These errors are especially costly in Web3 infrastructure where wallet addresses and fee structures dictate access. A single misconfiguration can turn a paying user into a frustrated one.
Incorrect header formatting
The Pay header is the primary signal for 402 endpoints. If the formatting doesn't match the API spec exactly, the server rejects the request before checking funds. This often happens when developers copy-paste headers without adjusting for specific currency codes or token standards. Ensure your client library handles header serialization correctly, especially when switching between ERC-20 tokens and native coins.
Wallet address mismatches
A mismatch between the sender's wallet and the authorized payer address triggers immediate rejection. In Web3, this is common when multiple wallets are used for testing versus production. Always verify that the from address in the transaction matches the Authorization header's signature. Double-checking this alignment prevents lost transactions and confused user support tickets.
Fee calculation errors
Underestimating gas fees or mispricing the API call leads to failed transactions. If the user's wallet doesn't hold enough ETH to cover the gas plus the API fee, the call fails with a 402 error. Use official source guidelines to calculate the total cost upfront, including a buffer for network congestion. This ensures the user has sufficient balance to complete the transaction without unexpected failures.
No comments yet. Be the first to share your thoughts!