What is the 402 payment protocol?
The HTTP 402 status code—formally known as "Payment Required"—was originally designed to support digital cash systems, but it sat dormant in the HTTP specification for decades. While modern web developers typically associate 402 errors with misconfigured billing gateways, the protocol’s underlying logic is perfectly suited for the emerging world of agentic commerce.
The 402 protocol operates on a simple, stateless exchange: a client requests a resource, the server responds with a 402 status code containing payment instructions, and the client fulfills the payment to access the data. Unlike legacy subscription models that rely on recurring billing cycles and complex account management, 402 enables pay-per-request transactions. This makes it ideal for machine-to-machine interactions where autonomous agents need to purchase small amounts of data or compute power without human intervention.
x402 is the modern implementation of this standard, specifically tailored for cryptocurrency micropayments. Instead of waiting for a monthly invoice, an AI agent can instantly verify a USDC payment via a smart contract and immediately access the requested API endpoint. This shift from subscription-based access to transactional access reduces friction and allows for granular, real-time monetization of digital assets.
Set up the x402 payment gateway
Implementing x402 requires swapping out traditional authentication middleware for a payment-verification layer. Unlike legacy billing systems that rely on static API keys or subscription tokens, x402 shifts the trust model to on-chain transactions. The server intercepts requests, challenges the client with a 402 status code, and only delivers the payload once the payment is confirmed.
To build this, you need to configure your API backend to handle the three-step handshake: challenge, sign, and verify. Most developers integrate this through a provider like Laevitas or Nansen, which standardizes the protocol details so you don't have to write the cryptographic verification logic from scratch.
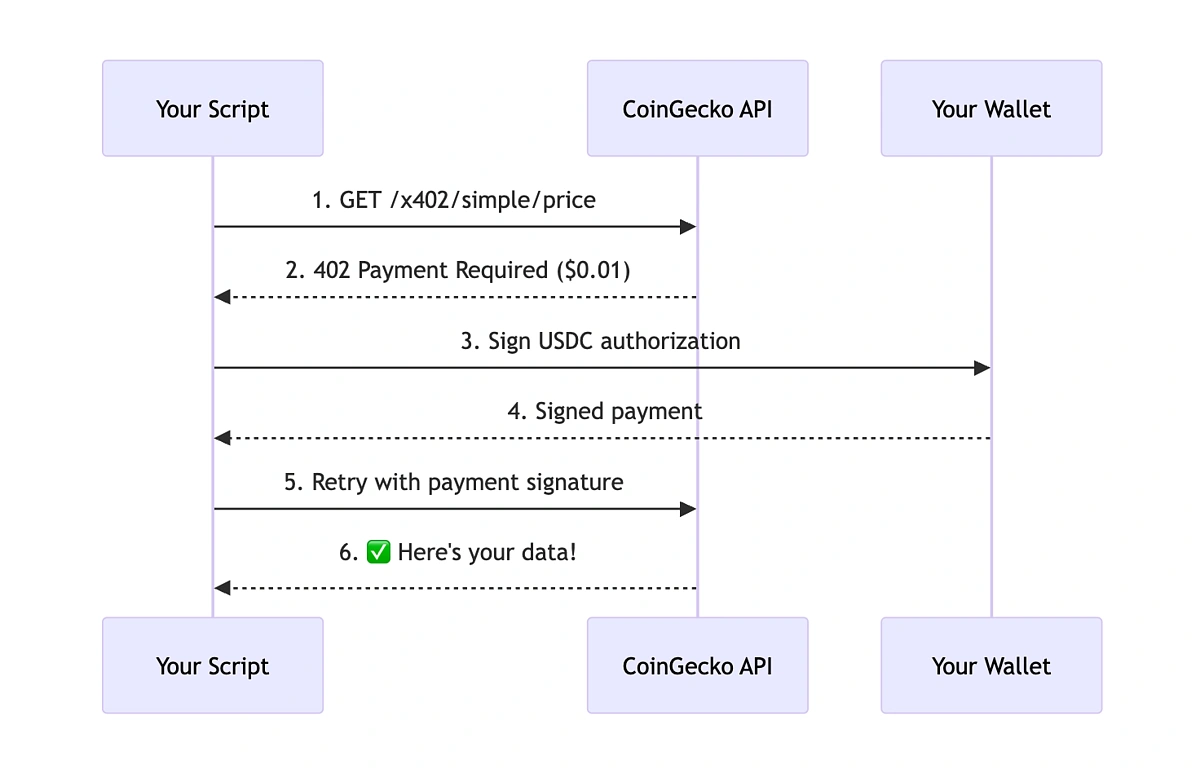
Start by installing the x402 middleware package for your specific backend framework (e.g., Express, FastAPI, or Go). This middleware acts as a gatekeeper. You must configure it to intercept incoming requests to your protected endpoints. Instead of immediately processing the query, the middleware checks for a valid payment signature. If none is present, it returns a 402 status code containing the payment instructions, including the required USDC amount and the recipient wallet address.
You cannot verify blockchain transactions manually in real-time for every API call. Integrate a facilitator service like Laevitas or Nansen. These services handle the heavy lifting of monitoring the blockchain for your specific transaction hash. You will need to register your API endpoint with the facilitator and provide your wallet address. The facilitator provides an API endpoint that your middleware calls to verify if the payment has been successfully broadcast and confirmed on-chain.
Your API consumers (bots, agents, or apps) need a way to pay. Provide them with the payment instructions embedded in the 402 response. This typically involves a link to a transaction builder or a simple script that signs a USDC transfer to your address. For agentic workflows, ensure the client can parse the 402 response automatically, sign the transaction using their private key, and resend the request with the payment proof attached. This creates a seamless pay-per-call loop without manual intervention.
Before going live, test the full cycle locally. Send a request to your endpoint, capture the 402 challenge, execute the payment on a testnet (like Sepolia), and confirm that your middleware accepts the proof. Check edge cases: what happens if the payment is pending? What if the signature is invalid? Ensure your middleware returns a clear error message or a retry-after header so clients know how to adjust their timing.
Handle the 402 challenge response
When a server enforces x402, it doesn't just reject your request; it hands you a ticket to pay. The client receives an HTTP 402 response containing a specific challenge payload. This payload defines exactly what needs to be signed to access the resource.
Unlike legacy billing systems that rely on credit cards or subscriptions, x402 is transactional. The server issues a cryptographic challenge that proves you have paid. Your client must intercept this response, construct a payment proof, and resend the request with that proof attached.
1. Intercept the 402 Response
Your HTTP client or middleware needs to catch the 402 status code before the application logic throws an error. In most x402 implementations, the response body contains a JSON object with a challenge field. This field holds the data you need to sign.
if (response.status === 402) {
  const challengeData = await response.json();
  // Proceed to sign the challenge
}
2. Extract the Challenge Data
The challenge payload typically includes a unique transaction ID, the amount due, and the message to be signed. This message is usually a hash or a structured string that binds the payment to the specific API call. Extract these fields precisely. Any mismatch in the challenge data will cause the signature verification to fail on the server side.
3. Sign the Payment Proof
Using your private key, sign the extracted challenge message. This step creates the cryptographic proof of payment. The signature confirms that you authorize the transaction and have the necessary funds. Ensure you are using the correct hashing algorithm specified by the protocol (often SHA-256 or similar, depending on the implementation).
4. Resend with the Proof
Attach the signature to a new request. This is usually done by adding a custom header, such as X-Payment-Proof, or by including the signature in the request body. The server will verify the signature against the public key associated with your account or wallet. If valid, it grants access to the resource.
Verify payments and deliver data
Once the client submits the signed payment proof via the x-payments header, the server’s job shifts to validation. This step is where agentic x402 differs from legacy billing: the server must verify the cryptographic signature and confirm the transaction state in real-time before releasing any data.
1. Extract the Proof
The server first parses the x-payments header to isolate the payment proof payload. This payload contains the transaction hash, the amount, and the signature. Unlike legacy systems that might check a database for a subscription status, x402 relies on on-chain or off-chain verification of this specific cryptographic signature.
2. Verify the Signature
Using the public key associated with the payment protocol (such as the Laevitas facilitator or a specific wallet address), the server validates the signature. This ensures the payment was authorized by the account holding the funds. If the signature is invalid or expired, the server immediately returns a 402 Payment Required response, blocking the request.
3. Confirm Payment State
A valid signature is necessary but not sufficient; the server must also confirm the payment has settled. For on-chain payments like USDC, this means checking the transaction status on the relevant blockchain. For off-chain facilitated payments, the server queries the facilitator’s API to confirm the funds have been escrowed or transferred. This step prevents replay attacks and ensures the client actually paid the requested amount.
4. Deliver the Response
If the payment is verified and confirmed, the server processes the original request as if no error occurred. The API response—whether JSON, XML, or binary data—is delivered to the client. This entire flow happens in milliseconds, enabling the microtransaction model that makes pay-per-API viable for high-volume, low-cost data access.
Common x402 integration errors
Getting x402 right requires precision. Unlike traditional billing, which often hides payment logic behind webhooks and session tokens, x402 relies on immediate, self-contained cryptographic proofs. If these proofs are malformed, the entire flow breaks. Below are the most frequent technical pitfalls encountered during implementation.
Expired or invalid proofs
The x402 specification requires the client to include a signed proof in the request header. This proof contains a timestamp and a nonce. If the timestamp is outside the allowed drift window (usually a few minutes), the server rejects the request as expired. Ensure your client clocks are synchronized and that your server validates the proof signature against the correct public key.
Incorrect signature formats
x402 proofs must be signed using specific cryptographic algorithms (typically EdDSA or ECDSA). A common error is using a standard JWT or a different signature scheme that the x402 middleware doesn't recognize. The signature must be base64url-encoded and placed in the correct header field. Double-check that your signing library matches the protocol's exact requirements.
Misconfigured HTTP 402 responses
Returning a 402 status code is only half the battle. The response must include a Payment-Required header that tells the client exactly how to pay. If you return a generic 402 without this header, the client cannot generate the correct proof. Ensure your server logic dynamically generates the payment instruction based on the requested resource.
Missing or incorrect nonce handling
The nonce prevents replay attacks. If your server accepts the same nonce twice, the proof is invalid. Ensure your backend stores used nonces temporarily and rejects duplicates. Failing to validate the nonce properly can lead to security vulnerabilities where attackers replay old, valid proofs to access paid resources.
No comments yet. Be the first to share your thoughts!