Set up the x402 gateway
Implementing x402 works best as a sequence, not a scramble through settings. Do the minimum first: confirm compatibility, connect the core hardware, update only when needed, and test the result before adding optional features. That order keeps the task understandable and makes failures easier to isolate. After each step, pause long enough for the interface to finish syncing. Many setup problems are timing problems disguised as configuration problems. If the same step fails twice, record the exact error, restart the smallest affected piece, and retry before moving deeper.

Configure stablecoin payment headers
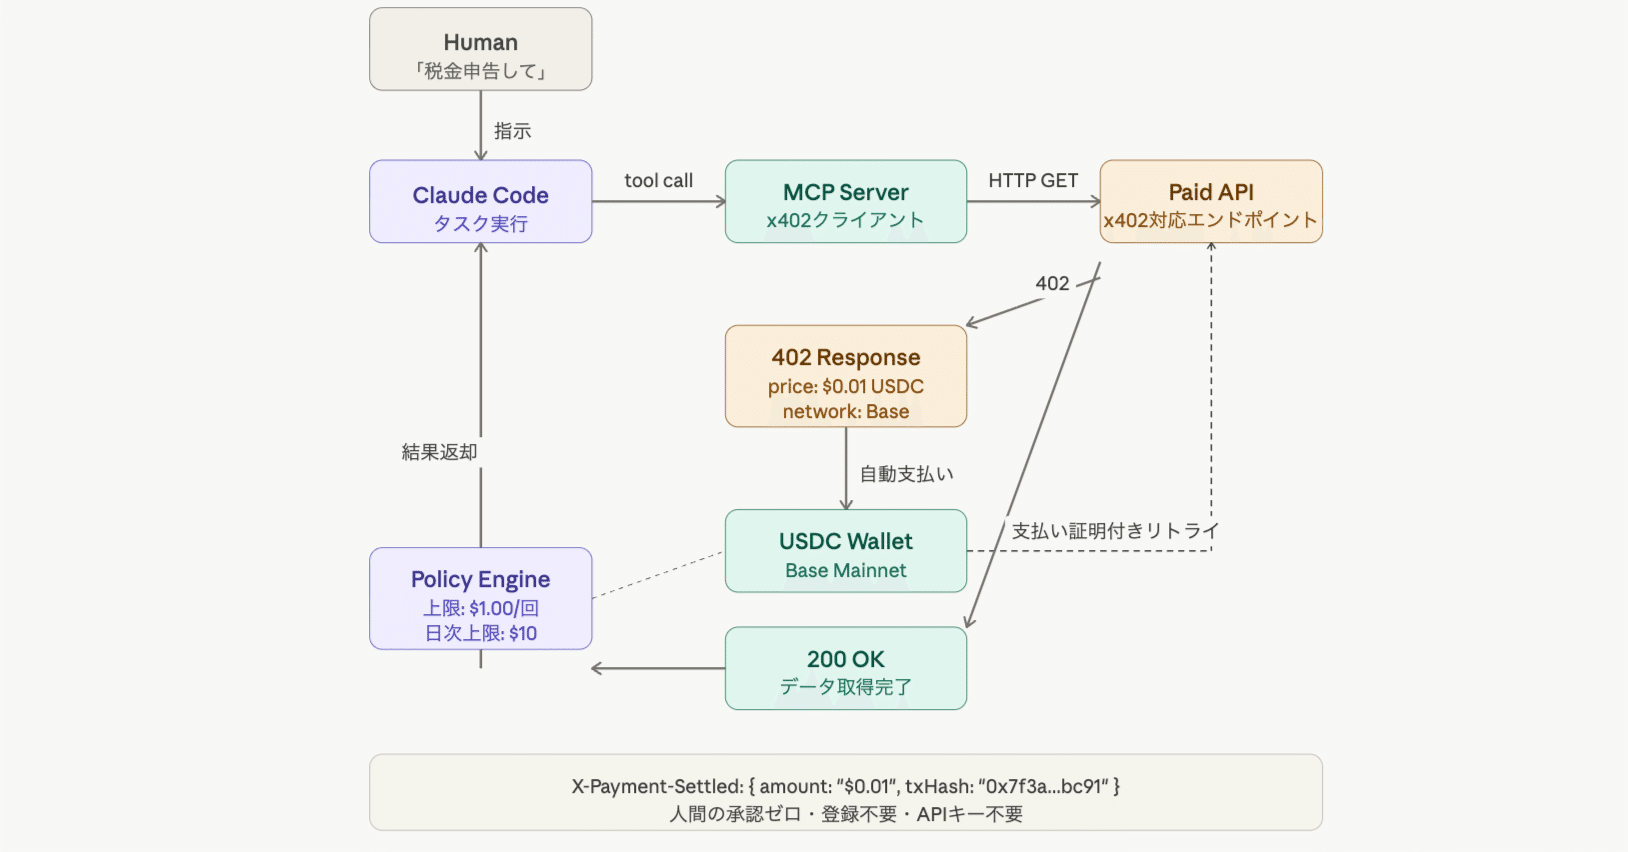
The core of x402 is how you structure the HTTP response. When a client requests data without payment, your server responds with a 402 Payment Required status. This isn't just an error; it's a payment instruction. You must include specific headers that tell the client exactly how to pay.
The most critical header is X-HTTP-402-Pay. This header carries the payment details in a structured format. It typically includes the wallet address where funds should be sent, the exact amount due, and the currency type. For AI agent workflows, using stablecoins like USDC on Base is the standard. This ensures predictable pricing and instant settlement, avoiding the volatility of native tokens.
You also need to specify the X-HTTP-402-Pay-Amount and X-HTTP-402-Pay-Currency. These headers break down the transaction requirements. For example, if you are charging one cent per query, your headers might look like this:
HTTP/1.1 402 Payment Required
X-HTTP-402-Pay: wallet=0x...&amount=0.01¤cy=USDC
X-HTTP-402-Pay-Amount: 0.01
X-HTTP-402-Pay-Currency: USDC
This structure allows compliant clients to parse the request and initiate a payment transaction automatically. Once the payment is confirmed on-chain, the client can retry the request, and your server will return the data with a 200 OK status. This flow creates a seamless, trustless payment loop for your API.
Connect x402 to AI Agent SDKs
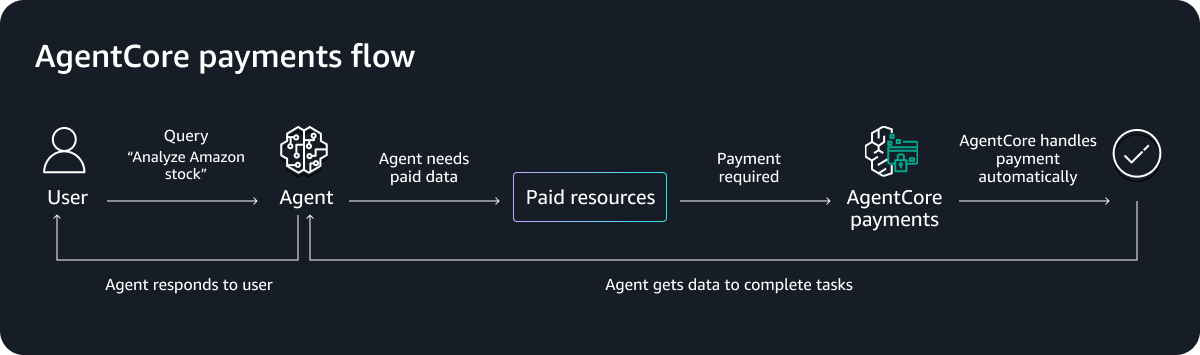
Integrating x402 into your AI agent infrastructure turns abstract payment protocols into functional, autonomous revenue streams. By connecting the protocol to popular frameworks like Vercel’s MCP or LangChain, you enable agents to handle the entire payment flow without human intervention.
This process requires configuring the agent SDK to recognize the HTTP 402 status code as a payment request rather than an error. When an agent encounters this status, it must trigger a crypto transaction, wait for confirmation, and then retry the API call with the required payment details attached.
1. Configure the MCP Server for Payments
Vercel has released an x402 MCP (Model Context Protocol) extension that simplifies attaching paid tool payments to MCP servers. This extension acts as the bridge between your AI agent and the payment infrastructure. You need to install the package and configure it to listen for 402 responses from your target APIs.
The configuration involves defining which tools require payment and setting the acceptable cryptocurrency for those transactions. This setup ensures that the agent knows exactly when and how to pay for specific resources.
2. Update Agent SDK Payment Logic
Once the MCP server is ready, you must update your agent’s SDK logic to handle the payment cycle. Instead of treating a 402 response as a failure, the agent should parse the payment instructions embedded in the response headers.
This involves writing a middleware function that intercepts the API response, initiates a transaction via your preferred wallet provider, and monitors for blockchain confirmation. Only after the transaction is confirmed should the agent proceed with the original request.
3. Test the Autonomous Payment Flow
Before deploying to production, test the integration with a sandbox environment. Use a testnet cryptocurrency to simulate the payment process and verify that the agent correctly handles payment confirmations and retries.
This step is critical for ensuring that your agents can operate autonomously without getting stuck in payment loops or failing due to network latency. Verify that the agent logs payment transactions for auditing purposes.
Add the x402 MCP package to your project dependencies and initialize it with your API endpoints. This extension handles the initial handshake and payment request parsing.
Update your agent’s SDK to intercept 402 responses. Implement a payment handler that triggers a transaction and waits for confirmation before retrying the request.
Use a testnet to simulate payment flows. Verify that the agent correctly processes transactions and retries requests after payment confirmation.
Verify on-chain transactions before granting access
Before your API returns any data, you must confirm the payment actually happened. In an x402 flow, the client sends a 402 Payment Required response with a transaction hash. Your backend logic needs to take that hash, look it up on the blockchain, and validate the details against your server's requirements.
This isn't just about checking if the transaction exists. You need to verify three specific things:
- The recipient address matches your server's wallet. Ensure the funds went to the correct destination, not a phishing address or a previous version of your wallet.
- The amount is sufficient. Confirm the transaction value meets or exceeds the price defined in your API route.
- The network confirmation is solid. Don't trust the first block. Wait for a few confirmations (usually 12-30 for Base, depending on your risk tolerance) to prevent double-spend attacks or chain reorgs.
For high-stakes implementations, consider using a reliable indexer or a direct RPC call to a trusted node provider. Avoid trusting client-side data entirely. If the verification fails, return the 402 status again with a clear error message explaining why the transaction was rejected.
Once verified, log the transaction hash and grant access. You should also store this record to prevent duplicate charges if the client retries the same transaction.
Common x402 implementation errors
Even with a solid plan, small oversights in x402 implementation can break your API’s reliability. Since x402 relies on HTTP 402 status codes and on-chain payment verification, precision is non-negotiable. Below are the most frequent pitfalls developers encounter when building pay-per-API infrastructure, along with how to avoid them.
Incorrect header formatting
The x402 specification requires strict adherence to HTTP header syntax. A common error is misformatting the Payment header or including invalid payment details. Ensure that the Payment header contains valid payment instructions, including the correct amount, currency, and recipient wallet address. Any deviation can cause the client to reject the request or the server to fail verification.
Race conditions in transaction verification
Verifying on-chain transactions introduces latency. If your server processes the payment before the transaction is confirmed, you risk accepting unconfirmed or double-spent transactions. Implement a robust verification loop that waits for the required number of block confirmations before serving content. This ensures that payments are final and irreversible, protecting your API from fraud.
Ignoring idempotency
Clients may retry requests due to network issues or timeouts. Without proper idempotency handling, your API might process the same payment multiple times, leading to double-charging and user frustration. Implement idempotency keys to ensure that each payment is processed only once, even if the client sends the same request multiple times.
Frequently asked questions about x402
How do I implement x402 headers in Node.js?
Use a middleware function to intercept outgoing responses. If the request lacks valid payment proof, set the status to 402 and attach the X-HTTP-402-Pay header with the required wallet address, amount, and currency. Example:
res.status(402).set('X-HTTP-402-Pay', 'wallet=0x...&amount=0.01¤cy=USDC');
res.send('Payment Required');
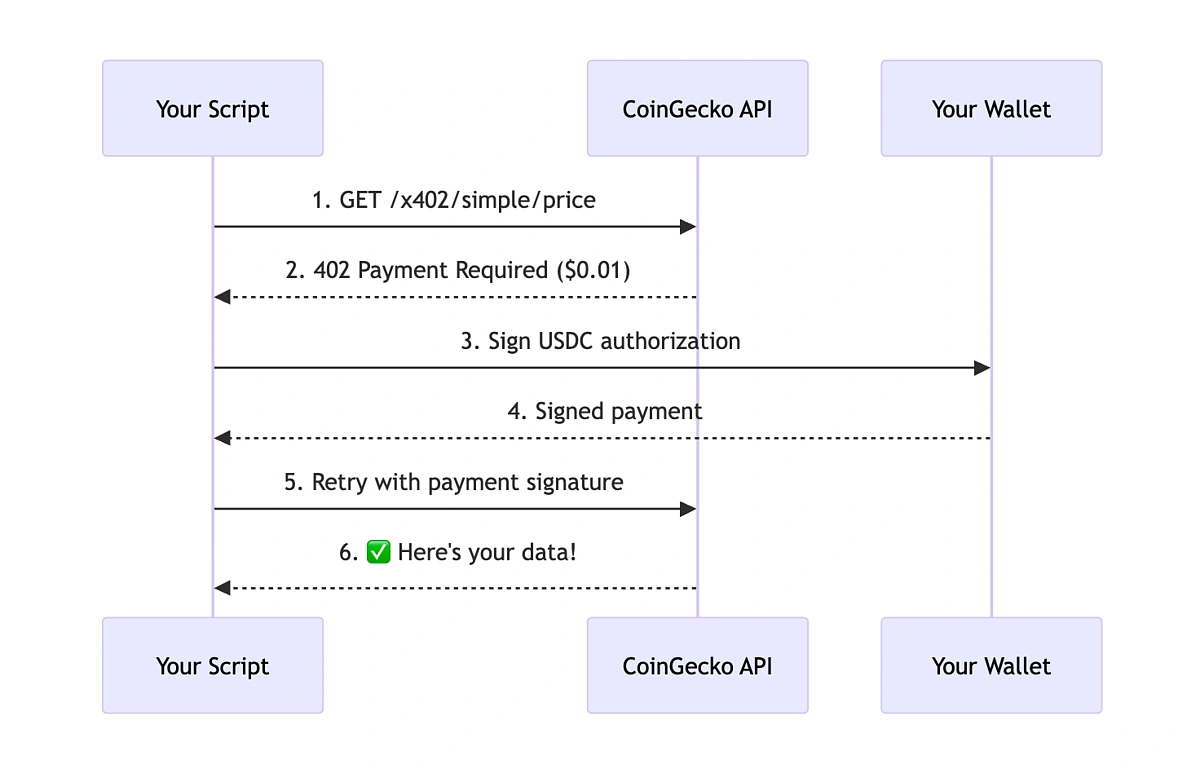
How do AI agents handle x402 payments automatically?
Agents using compatible SDKs (like Vercel’s MCP or LangChain) are configured to recognize the 402 status. Upon receiving it, the agent parses the payment instructions, initiates a transaction via its connected wallet, waits for blockchain confirmation, and then retries the original request with the payment proof attached.
Is x402 only for Base network?
No, x402 is network-agnostic. However, using stablecoins on low-fee, high-speed networks like Base is recommended for AI agent workflows to minimize transaction costs and latency. You can configure any EVM-compatible chain by updating the currency and wallet parameters in the headers.
Helpful gear
Use these product recommendations as a starting point, then choose the size, material, and price point that fit how you actually use the gear.

As an Amazon Associate, we may earn from qualifying purchases.
No comments yet. Be the first to share your thoughts!