What the 402 status code means
The HTTP 402 "Payment Required" status code is a reserved response originally defined in 1997 for future payment systems. For decades, it sat unused, while the 401 (Unauthorized) and 403 (Forbidden) codes handled access control.
Today, 402 is the backbone of pay-per-API infrastructure. Instead of returning an error, a server uses this code to signal that a payment is needed to access the resource. This distinguishes it from standard authentication failures.
When a client requests an API endpoint protected by x402, the server responds with a 402 status. This response includes a payment request, often via a Bitcoin Lightning invoice. The client settles the payment, and the server grants access.
This mechanism shifts the paradigm from pre-paid subscriptions or API keys to direct, transactional payment. It allows for granular billing where every API call can be charged individually.
How x402 handles payments
x402 reuses the HTTP 402 Payment Required status code to turn standard API calls into instant microtransactions. Instead of a subscription or API key, the server tells the client exactly what to pay before granting access.
The process follows a strict sequence:
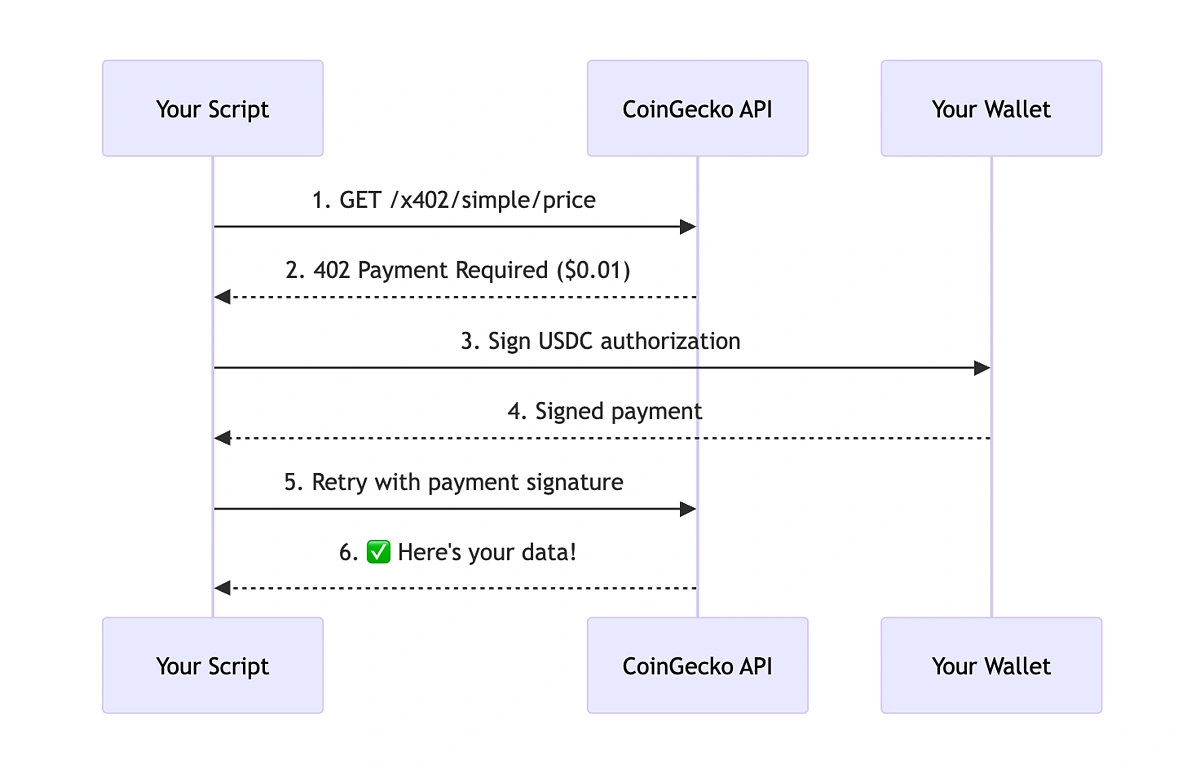
This mechanism allows for frictionless, pay-per-call access without the overhead of recurring billing or complex authentication keys. The 402 status code serves as the handshake, ensuring that payment is a prerequisite for data retrieval.
Set up the payment gateway
To build a functional pay-per-API system, you need to connect your API endpoints to a payment processor capable of handling HTTP 402 responses. This gateway acts as the gatekeeper, validating transactions before granting access to your data or services.
The process involves three core steps: selecting a compatible provider, configuring your API routes, and testing the verification flow. We will use SatGate as our primary example, as it explicitly supports L402/402 payment rails and allows you to enforce scope, budget, and payment requirements directly at the gateway level [src-serp-6].
1. Choose a 402-Compatible Provider
Not all payment gateways support HTTP 402. You need a provider that can intercept API requests, check for payment status, and return the correct status code. SatGate is a strong candidate for this because it treats 402 as a native payment rail rather than an afterthought. Look for providers that offer SDKs or middleware for your specific backend language (Node.js, Python, Go, etc.).
2. Define Priced Endpoints
Once your provider is selected, you must map your API routes to specific price points. This is where you define the cost per request. For example, a simple data fetch might cost $0.001, while a complex AI inference might cost $0.05. Your gateway needs to know exactly how much to charge for each endpoint. This configuration is typically done via the provider's dashboard or a configuration file.
3. Implement Verification Middleware
Your API needs a way to verify that a payment was successful before returning data. This is usually done via middleware that checks for a valid transaction ID or payment proof in the request headers. If the payment is missing or invalid, the middleware should return a 402 Payment Required response. If it’s valid, the request proceeds to your business logic.
Pre-Deployment Checklist
Before you push your pay-per-API to production, run through this quick verification list to ensure your infrastructure is robust and secure.
-
Wallet Integration: Ensure your backend can verify blockchain transactions or fiat payments depending on your provider. Test with a small testnet or sandbox transaction.
-
Rate Limiting: Configure rate limits to prevent abuse. Even with payment gates, attackers might try to brute-force endpoints. Set a maximum number of requests per minute per user.
-
Error Handling: Verify that your API returns clear, informative 402 errors. The response should include instructions on how to pay, such as a link to a payment page or a QR code.
-
Logging & Monitoring: Set up logs to track failed payment attempts. This data is crucial for identifying fraud or usability issues in your payment flow.
-
Documentation: Update your API docs to clearly state the pricing model and payment requirements. Developers should know the cost before they make their first request.
Pricing your API endpoints
Setting a fair price for your x402 infrastructure requires balancing your operational costs against what the market will bear. Unlike traditional SaaS subscriptions, per-request pricing demands precision; underpricing erodes margins on high-volume endpoints, while overpricing creates friction for legitimate users. The goal is to structure your pricing model so that costs scale linearly with usage, ensuring every request contributes to your bottom line.
Calculate your baseline costs
Before setting a public price, determine your break-even point. You need to account for server compute time, bandwidth, and the gas fees associated with on-chain transactions if you are using crypto payments. Moesif suggests evaluating transaction volume, data volume, and revenue shares as primary metrics for this calculation. For compute-heavy endpoints like AI inference, charge per token or per second. For simple data retrieval, charge per request. Be transparent about these variables in your documentation to build trust with developers who will integrate your API.
Choose a pricing model
Select a model that aligns with user behavior. Flat-rate per-request pricing is simple but can discourage high-volume usage. Tiered pricing rewards heavy users with lower per-unit costs, encouraging loyalty. Usage-based pricing with a free tier lowers the barrier to entry, allowing developers to test your x402 integration without upfront risk. Consider the friction of payment: if you require crypto transactions for every single call, the gas fees may outweigh the API cost for low-value requests. In such cases, batching payments or using a subscription layer on top of x402 may be more efficient.
Compare subscription vs. pay-per-use
The choice between a traditional subscription model and a pay-per-use 402 model significantly impacts user adoption and revenue stability. The table below highlights the core differences to help you decide which approach fits your API's value proposition.
| Model | Cost Structure | Flexibility | User Friction |
|---|---|---|---|
| Subscription | Fixed monthly fee | Low (static limits) | High (credit card, sign-up) |
| Pay-Per-API 402 | Variable (per request) | High (pay only for use) | Medium (crypto wallet, gas) |
Handle transaction fees
In a crypto context, transaction fees (gas) can eat into your revenue if not managed correctly. If you are charging small amounts per request, the network fee might exceed the API cost. To mitigate this, consider batching multiple requests into a single transaction or using a Layer 2 solution with lower fees. Clearly communicate to users whether the displayed price includes gas or if it is an additional cost. This transparency prevents disputes and ensures a smooth payment experience when the HTTP 402 status code is triggered.
Common Pay-Per-API Integration Mistakes
Building x402 infrastructure requires precision. The protocol relies on a strict sequence: the client requests a resource, the server responds with a 402 status and payment requirements, and the client signs a USDC payment for verification. Deviating from this flow causes silent failures or security gaps.
Ignoring Gas Fees and Network Costs
A signed transaction is useless if it cannot be confirmed. If your API handles Ethereum-based payments, you must account for gas fees. Ignoring these costs leads to failed transactions where the client’s signature is valid, but the blockchain rejects the transfer. Always calculate the total cost, including network fees, before presenting the payment requirement to the client.
Failing to Verify Signatures
Never trust a payment payload without verification. The 402 standard requires the facilitator or server to verify the cryptographic signature of the USDC payment. Skipping this step exposes your API to replay attacks or fraudulent claims. Use official libraries to validate that the signature matches the sender’s wallet and that the payment was actually broadcast to the network.
Poor Error Handling for Failed Payments
When a payment fails, the response must be clear. A generic 500 error confuses developers and hides the real issue. If the signature is invalid or the transaction is pending, return a specific error code explaining the failure. This allows the client to retry or correct the payment details without manual intervention.
Overlooking Scope and Budget Limits
Integrating x402 is not just about collecting payment; it is about enforcing authority. As noted by SatGate, HTTP 402 and L402 act as paid rails around authority decisions. Ensure your integration checks scope and budget limits before processing the request. Without these checks, a single valid payment could grant unlimited access to high-value resources.
No comments yet. Be the first to share your thoughts!