What is the x402 payment protocol
The x402 protocol is a modern implementation of the HTTP 402 status code, designed to enable instant, automatic stablecoin payments directly over standard HTTP requests. While the original HTTP specification reserved the 402 code for future payment systems decades ago, it remained largely unused until x402 provided a practical framework for agentic commerce.
Unlike legacy billing models that rely on manual checkout flows, subscription gateways, or complex merchant accounts, x402 embeds payment logic into the protocol itself. When a client requests a resource, the server can respond with a 402 status code containing a payment instruction. The client—whether a human user or an autonomous agent—sends the payment, and the server grants access upon verification.
This shift transforms APIs from static endpoints into dynamic economic agents. Instead of abstracting payments behind a separate billing layer, x402 makes the transaction atomic and immediate. For developers, this means integrating payment handling directly into your API response logic, allowing for micro-transactions and pay-per-use models that were previously too cumbersome to implement.
How x402 enables pay-per-call access
x402 transforms the HTTP protocol by turning the 402 status code into a payment instruction. Instead of relying on subscription fees or complex API keys, this open protocol allows any HTTP endpoint to request stablecoin payments directly from the client. It works like a digital toll booth: the server signals a price, the client pays, and access is granted instantly.
The mechanism relies on a simple request-payment-response loop. When a client calls an x402-enabled API, the server responds with a 402 Payment Required status. This response includes a Pay header containing a payment intent. The intent specifies the required amount, the cryptocurrency (usually a stablecoin like USDC), and the destination wallet address.
To proceed, the client must sign and broadcast a transaction matching that intent. Once the network confirms the payment, the client resends the original request with a Pay-Receipt header. The server verifies the receipt and returns the 200 OK response along with the requested data.
This flow eliminates the need for pre-funded accounts or recurring billing. You only pay for the specific calls you make, settling in seconds using the same HTTP connection.
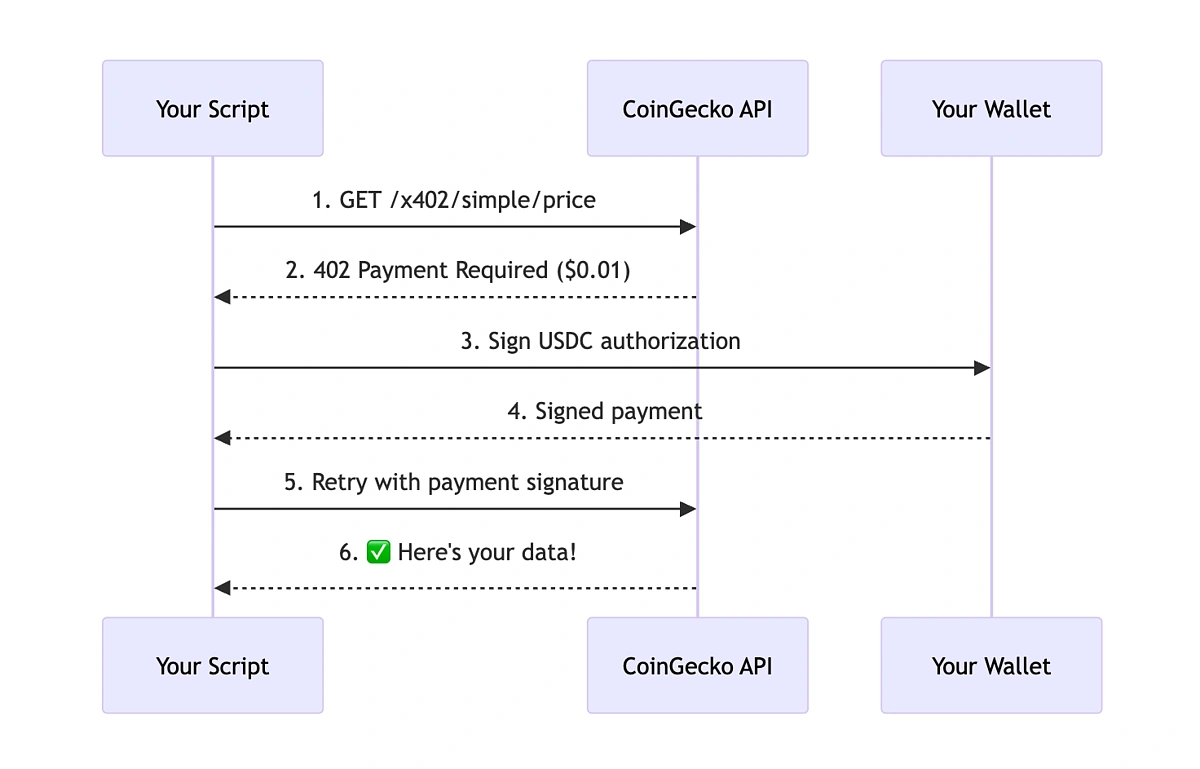
The client makes a standard HTTP GET or POST request to the API endpoint. The server recognizes the request requires payment and interrupts the flow.
The server responds with a 402 Payment Required status. The response body or headers contain a Pay directive specifying the exact stablecoin amount and wallet address needed to retrieve the data.
The client wallet signs a transaction for the specified amount and broadcasts it to the blockchain network. This step triggers the on-chain settlement process.
After the transaction is confirmed, the server validates the payment receipt. It then returns a 200 OK status with the requested API data, completing the pay-per-call cycle.


As an Amazon Associate, we may earn from qualifying purchases.
Setting up x402 in your Next.js app
Implementing x402 in a Next.js environment requires bridging your API route handlers with a payment verification layer. The goal is to intercept requests, validate that a payment has been made, and only then serve the API data. This setup turns your endpoints into secure, monetized resources without requiring users to navigate away from your application.
We will use the @x402/x402 library, which provides the necessary middleware and utilities to handle HTTP 402 responses and payment proofs. This approach keeps the logic contained within your Next.js server components or API routes, ensuring a seamless developer experience.
Step 1: Install the x402 library
First, add the official x402 package to your Next.js project. This library contains the core logic for generating payment proofs and verifying them against the HTTP request.
npm install @x402/x402
Step 2: Configure your API route
In your Next.js API route (e.g., app/api/data/route.ts), you need to intercept incoming requests. Use the x402 middleware to check for a valid payment proof in the request headers or body. If no payment is detected, the middleware should automatically return a 402 Payment Required status code.
import { NextResponse } from 'next/server';
import { verifyPayment } from '@x402/x402';

export async function POST(request: Request) {
  // Verify the payment proof attached to the request
  const isValid = await verifyPayment(request);

  if (!isValid) {
    return NextResponse.json(
      { error: 'Payment required' },
      { status: 402 }
    );
  }

  // Process the request and return data
  return NextResponse.json({ data: 'Your protected API content' });
}
Step 3: Handle the 402 response in your client
On the frontend, when you make a fetch request to your API, you must handle the 402 status code. This is where you trigger the payment flow. You can use a wallet provider or a payment gateway to collect the necessary funds and then retry the request with the payment proof attached.
async function fetchData() {
  try {
    const response = await fetch('/api/data', { method: 'POST' });

    if (response.status === 402) {
      // Trigger payment flow
      await initiatePayment();
      // Retry with payment proof
      return await fetchData();
    }

    return await response.json();
  } catch (error) {
    console.error('Failed to fetch data', error);
  }
}
Step 4: Test your implementation
Use tools like Postman or cURL to test your API endpoint. First, send a request without any payment proof. You should receive a 402 Payment Required response. Then, simulate a payment and include the proof in the headers. The endpoint should now return the protected data.
Step 5: Secure your payment verification
Ensure that your payment verification logic is robust. Never trust client-side checks alone. Always verify the payment proof on the server side using the x402 library's verification functions. This prevents users from bypassing the payment system by modifying client-side code.
Step 6: Document your API
Clearly document the payment requirements for your API. Include examples of how to attach payment proofs to requests and explain the 402 status code. This helps developers integrate with your API smoothly and reduces support queries.
Step 7: Monitor and iterate
Once your API is live, monitor the payment success rates and error logs. Adjust your payment flow or API pricing based on user feedback and usage patterns. Continuous improvement ensures your pay-per-API model remains sustainable and user-friendly.
Common integration mistakes to avoid
Even with x402’s straightforward design, small implementation errors can break the payment flow or leave your API vulnerable. The most frequent issues fall into three buckets: header handling, signature verification, and error response formatting.
Ignoring the x-pay header
The x-pay header is the core of the x402 protocol. It carries the payment proof (usually a signed transaction or token) that the server must validate. A common mistake is ignoring this header entirely or treating it as optional. If your server doesn’t explicitly check for x-pay, you’ll either accept unpaid requests or reject valid ones because you’re looking in the wrong place.
Always validate the presence of x-pay before processing the request. If it’s missing, return a 402 Payment Required status with a clear error message directing the client to include the header. Don’t assume the client will figure it out on their own.
Weak signature verification
x402 relies on cryptographic signatures to prove payment. If your verification logic is loose—such as accepting unsigned payloads, skipping timestamp checks, or ignoring nonce validation—you risk replay attacks or forged payments. This isn’t just a theoretical risk; it’s the most common security hole in early x402 implementations.
Use official libraries or reference implementations to verify signatures. Don’t roll your own crypto. Ensure you’re checking the signature against the correct public key, validating the timestamp window, and verifying that the nonce hasn’t been used before. If any of these checks fail, reject the request immediately.
Poor error responses
When a payment is invalid or missing, your error response should be specific. A generic 400 Bad Request or 500 Internal Server Error doesn’t help the client fix the issue. Instead, return 402 Payment Required with a JSON body that explains what went wrong: missing header, invalid signature, expired token, etc.
Clients need actionable feedback to adjust their requests. Include details like which field failed validation or what the expected format is. This reduces support tickets and speeds up integration for developers using your API.
Real-world use cases for API monetization
The HTTP 402 status code is reserved for future payment systems, but the x402 protocol makes it practical today. It allows web services and AI agents to charge for API access directly over HTTP without subscriptions or API keys [src-serp-8]. This shifts the model from pre-paid credits to pay-per-call access [src-serp-5].
This approach solves specific friction points in three areas:
AI agent payments
AI agents need to execute tasks autonomously. They cannot easily manage credit cards or navigate subscription dashboards. x402 allows agents to pay for API calls programmatically. The agent sends a request, pays the required amount, and receives the response. This enables micro-transactions for every single action an agent takes.
Data scraping
Scraping APIs often use 402 to signal exhausted credits or expired subscriptions [src-serp-4]. With x402, scrapers pay only for the data they actually retrieve. There is no need to maintain a standing subscription for sporadic data needs. This reduces costs for intermittent scraping tasks.
High-compute endpoints
Running heavy computations on a server costs money. Traditional models require users to buy large blocks of compute time. x402 lets you charge per computation. Users pay exactly for the processing power they use. This prevents waste and ensures fair pricing for expensive operations.
No comments yet. Be the first to share your thoughts!