How x402 changes API billing
For years, API billing has been a subscription game. You buy a tier, get a key, and hope you don't hit the rate limit. x402 flips this model by enabling instant, automatic stablecoin payments directly over HTTP. Instead of managing complex Stripe subscriptions or waiting for monthly invoices, your code pays exactly for what it uses.
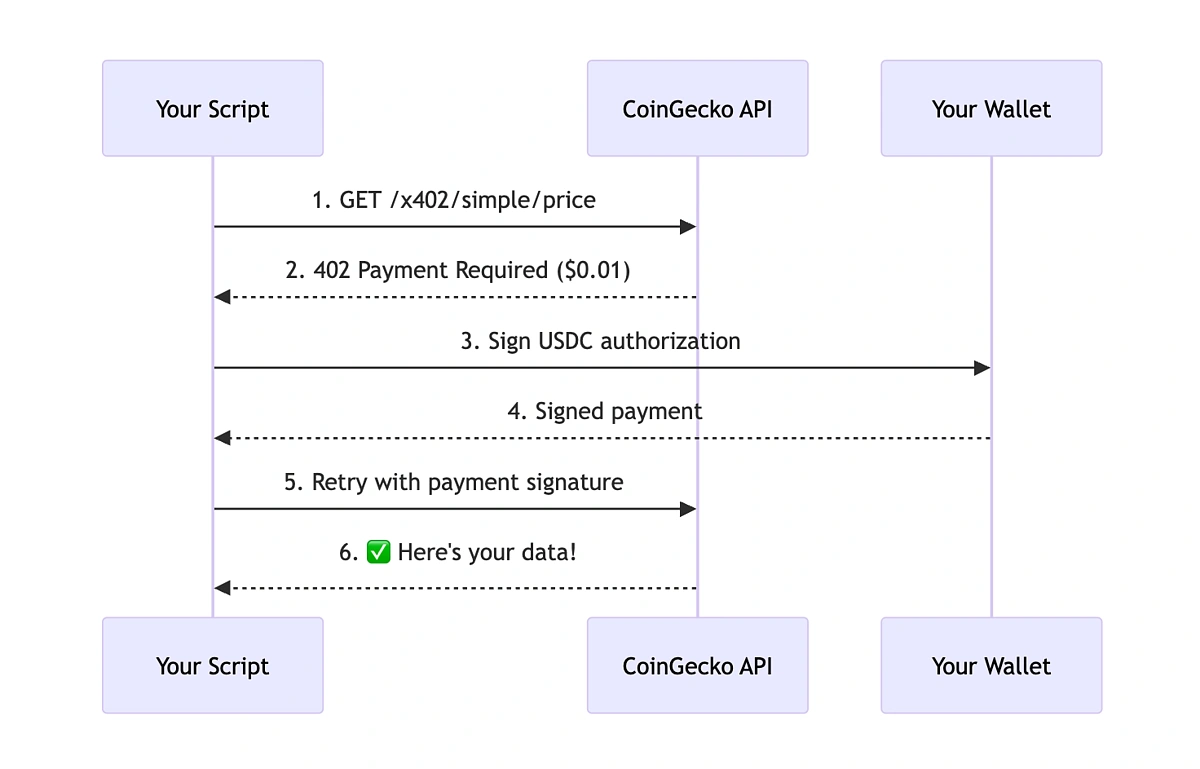
This shift moves us from static access tokens to transactional, wallet-based interactions. The protocol leverages the HTTP 402 status code—a standard originally reserved for future payment systems—to signal that access is granted only upon payment. For Web3 developers, this means integrating payments into the request lifecycle itself, rather than treating billing as an external administrative layer.
By using USDC for these transactions, costs are predictable and immediate. You can track exact spend per request in real-time, eliminating the surprise of overage charges or the friction of renewing expired keys.
Set up the x402 payment gateway
Building an x402 payment gateway is less about configuring a third-party processor and more about wiring your server to understand a new HTTP header. Coinbase Developer Platform (CDP) introduced x402 to let APIs charge for access directly over the request, using stablecoins like USDC. This removes the need for subscriptions or pre-paid credits for many use cases.
To get started, you need a CDP account and a wallet that can hold USDC. The protocol works by having your server return a 402 Payment Required status code with a specific x-pay-url header. The client (or an AI agent) then uses that URL to pay before accessing the data.
1. Initialize your CDP environment
First, install the Coinbase Developer Platform SDK in your project. This gives you the tools to generate payment URLs and verify transactions. You will also need to set up environment variables for your API key and wallet private key. Keep these secure; they are the keys to your payment gateway.
2. Configure your wallet
Create a new wallet within your CDP dashboard. This wallet will receive the USDC payments. You can start with a testnet wallet to avoid moving real funds while you debug. Make sure your wallet is funded with a small amount of the native token (ETH or POL) to cover gas fees if you are running on a chain that requires them.
3. Implement the 402 response
In your API route, check for the x-pay-url header. If it is missing, return a 402 Payment Required status code. Include the x-pay-url header in the response, pointing to a URL that your backend generates. This URL contains the payment instructions for the client.
4. Verify the payment
Once the client makes a payment, they will send a second request. Your server needs to verify that the transaction on the blockchain is valid and matches the amount and destination address specified in the x-pay-url. Only after verification should you return the 200 OK status and the requested data.
Run npm install @coinbase/coinbase-sdk in your project directory. This library handles the complex logic of signing transactions and verifying blockchain states. It is the backbone of your x402 implementation.
Initialize a wallet instance using your CDP API credentials. This wallet will be used to generate payment URLs and verify incoming transactions. Ensure you are using the correct network (mainnet or testnet) for your development phase.
Create a middleware function that intercepts incoming API requests. If the request does not contain a valid payment proof, return a 402 status code with the x-pay-url header. This header should point to a server-generated payment link.
When the client resubmits the request with payment proof, use the CDP SDK to verify the transaction on the blockchain. Check that the amount matches the expected fee and that the recipient address is your wallet. If valid, return the API response.
The cost of running this gateway is minimal, mostly consisting of the gas fees for verifying transactions. Since x402 uses stablecoins, your revenue is predictable and not subject to the volatility of assets like Bitcoin. This makes it ideal for micro-payments and pay-per-call APIs.


As an Amazon Associate, we may earn from qualifying purchases.
Handle stablecoin transactions securely
Microtransactions rely on speed and low fees, which is why USDC is the standard for x402. Unlike Bitcoin or Ethereum mainnet transactions, which can take minutes or cost dollars in gas, USDC on networks like Solana, Base, or Polygon settles in seconds for fractions of a cent. This makes it viable to charge $0.001 per API call without the transaction costs eating your margin.
To ensure your infrastructure handles these payments securely, you must treat the payment step as a critical part of your request lifecycle. The x402 protocol embeds the payment requirement directly into the HTTP response, but your server needs to verify the blockchain state before releasing data.
Verify the on-chain payment
When a client requests an endpoint, your server should not immediately return the data. Instead, check the 402 Payment Required response context for a payment transaction hash. Use a blockchain indexer or a lightweight RPC call to confirm that the USDC transfer has been broadcast and has at least one confirmation.
Do not rely on the client claiming they paid. The only proof of payment is the on-chain record. If the transaction is pending or fails, return a 402 status with a clear error message indicating the payment is incomplete.
Manage gas and network costs
Even with cheap stablecoins, you need to account for network variability. If you are running your own indexer, ensure it can handle peak loads during high-traffic periods. If you are using a third-party provider, verify their uptime guarantees and fee structures.
Always test your payment flow on a testnet (like Base Sepolia) before deploying to mainnet. This helps you identify edge cases where transactions might get stuck or where your verification logic fails under pressure.
Secure the API endpoint
Once the payment is verified, grant access to the specific resource. Do not grant access to the entire API. Use short-lived tokens or session IDs that expire after the data is served. This prevents users from sharing their payment credentials or reusing a single payment for multiple requests.
Implement rate limiting based on the payment amount. If a user pays for 100 calls, ensure your system tracks the remaining balance and blocks further requests once the limit is reached. This prevents abuse and ensures fair usage across your user base.
Monitor for failed transactions
Blockchain transactions can fail due to insufficient funds, network congestion, or smart contract errors. Set up alerts for failed payment attempts so you can investigate and support your users. A failed payment should not result in a permanent block; allow the user to retry with a corrected transaction.
Keep a log of all payment attempts, including the transaction hash, status, and timestamp. This data is crucial for debugging and for reconciling your revenue with on-chain activity. Regular audits of these logs will help you spot patterns of fraud or technical issues early.
Debug common 402 integration errors
Even with a solid x402 setup, integration hiccups are inevitable. The HTTP 402 status code is reserved for future payment systems, meaning most client libraries and middleware aren't built to handle it out of the box. When you return a 402, you're essentially telling the client, "Pay first, then proceed."
If your integration feels fragile, check these three common failure points. They account for the majority of support tickets we see in the developer community.
Signature validation failures
The most frequent error is a mismatch between the wallet signature and the request payload. The x402 spec requires the signature to be over the specific request headers and body. If your server rejects a valid signature, it's usually because the hashing algorithm or the header casing doesn't match what the client signed.
Ensure your validation logic normalizes headers before signing. Case sensitivity in HTTP headers is a common trap. Also, verify that the nonce (if used) is strictly enforced to prevent replay attacks. A mismatched signature means the payment is invalid, and the request should be rejected immediately.
Incorrect HTTP status codes
Some developers mistakenly return 403 Forbidden or 401 Unauthorized when a payment is missing. This confuses x402-compliant clients, which specifically look for the 402 code to trigger their payment flow. If you return a 401, the client will try to authenticate, not pay.
Always return 402 Payment Required with a clear Retry-After header if the payment window has expired. This gives the client a clear signal to initiate a transaction. If the payment is successful, the client will retry with the signed proof, and your server should then return the expected 200 OK response.
Missing or malformed headers
The x402 protocol relies on specific headers to pass payment proof. If these headers are missing or malformed, the server cannot verify the transaction. Common issues include incorrect Authorization header formatting or missing x-payment-proof fields.
Check your server logs for 402 responses that lack the expected proof headers. If a client sends a request without the proof, it's a client-side error. Ensure your documentation clearly specifies the required headers. Use the Coinbase Developer Platform documentation as your reference for the exact header structure.
Monitor API usage and revenue
You can’t manage what you don’t track. In a pay-per-API model, your monitoring infrastructure is the dashboard that tells you exactly who is calling your endpoints and how much revenue each request generates. Without real-time visibility, you’re flying blind on both security and profitability.
Start by integrating a lightweight telemetry layer that logs every HTTP 402 response. This status code signals that payment is required, so capturing these events helps you distinguish between legitimate unpaid requests and potential abuse. Use this data to build a simple usage ledger that maps API keys to wallet addresses.
For a more robust solution, consider dedicated API gateway tools that support native crypto payments. These platforms often provide built-in dashboards for tracking request volume, latency, and revenue in real time. This eliminates the need to build custom logging pipelines from scratch.
-
Set up request logging for all 402 responses
-
Map API keys to on-chain wallet addresses
-
Configure alerts for unusual traffic spikes
-
Test payment flow with small test transactions
No comments yet. Be the first to share your thoughts!