What HTTP 402 Means for APIs
When building a pay-per-api 402 guide, the first hurdle is understanding that HTTP 402 isn't just another error code. It is the official "Payment Required" status, reserved since the early days of the internet for digital transactions. While it rarely appears in standard browser navigation, it has found a new life in Web3 infrastructure.
Traditionally, developers handled payments with headers or custom logic. Modern implementations, such as those documented by the Coinbase Developer Platform, treat 402 as a native protocol signal. It tells the client that a cryptographic signature or payment proof is required to access the resource, rather than just a generic "try again" message.
This shift allows for micropayments and metered billing directly within the HTTP lifecycle. Instead of checking credit balances before every call, the server responds with 402 only when the payment fails, streamlining the flow for automated agents and high-volume API consumers.
Setting up the pay-per-api 402 gateway
To implement the pay-per-api 402 guide, you first need to configure the financial layer that sits between your API and the user. This involves connecting a payment provider that supports the HTTP 402 status code. Coinbase Developer Platform (CDP) is a primary option for this, as it natively supports the protocol for machine-to-machine (M2M) and web-based transactions [src-serp-5].
The setup process is straightforward but requires attention to detail regarding your API endpoints and webhook configurations. Follow these steps to get your gateway running.
Start by creating a new project in the Coinbase Developer Platform dashboard. Navigate to the API settings and explicitly enable the X-402 payment gateway. This action generates the necessary API keys and configures your environment to recognize and process 402 responses instead of standard 403 or 401 errors.
Map your API routes to specific price points. When a user requests a protected endpoint, your server should check for a valid payment token or session. If the user hasn't paid, your gateway returns an HTTP 402 status code along with a Pay header that details the exact cost and payment method required to access the resource.
Set up a secure webhook endpoint on your server to listen for payment confirmations. When a transaction is completed on the blockchain or by the payment provider, the gateway sends a signature-verified payload to your listener. Your server must validate this signature before granting access to the paid API endpoint, ensuring that payments are legitimate and not spoofed.
With these steps complete, your API is ready to accept frictionless payments. The next phase involves testing the flow with a sandbox environment to ensure your webhook listeners correctly handle success and failure states before going live.
Configure endpoints for x402 payments
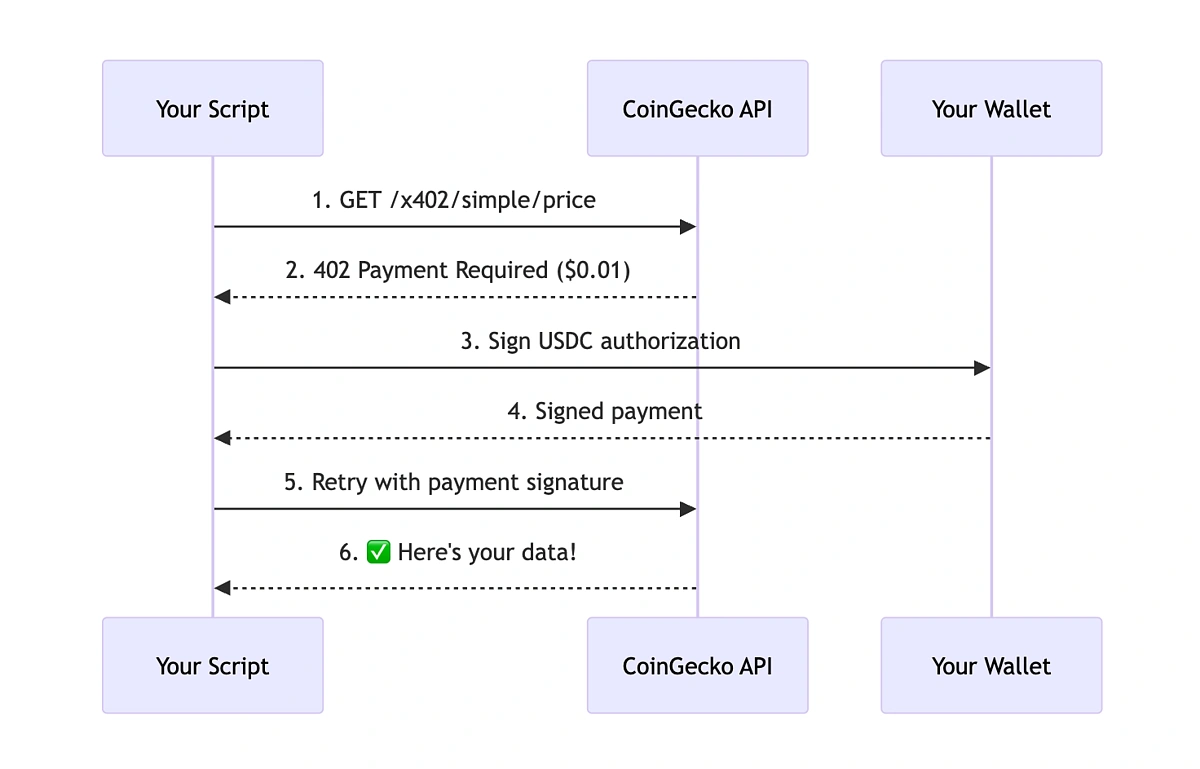
To build a pay-per-api 402 guide that actually works, you need to treat the HTTP 402 status code not as an error, but as a payment gate. Instead of returning data immediately, your API checks for a valid payment proof—typically a signed message or a token transfer on a chain like Base.
If the proof is missing or invalid, you return a 402 Payment Required response. This response should include metadata telling the client exactly what to pay and where. Once the payment is verified, the client resends the request with the proof attached, and your endpoint grants access.
503 Service Unavailable
rather than a 402, allowing the client to retry without re-paying. Always log failed verification attempts for security auditing, but never expose internal error details to the client.This approach ensures your API remains frictionless for paying users while strictly enforcing payment for non-paying clients. By leveraging the official 402 standard, you align with web protocols rather than fighting them.
Troubleshooting Common Pay-Per-API 402 Errors
Even with a solid pay-per-api 402 guide strategy, integration hiccups are inevitable. The HTTP 402 "Payment Required" status is reserved for future payment systems, but developers now use it to signal exhausted credits or subscription limits. When this error appears, it usually points to one of three specific configuration gaps.
Misconfigured Webhooks
Webhooks are the backbone of asynchronous payment proof. If your endpoint URL is incorrect, unreachable, or returns a non-200 status, the provider cannot confirm the transaction. This leads to a 402 error on subsequent API calls because the previous payment state remains unresolved. Always verify your webhook secret and endpoint availability using tools like RequestBin or the provider's dashboard logs.
Incorrect Payment Proof Formats
APIs often require a specific signature or transaction hash to validate a payment. If the payload format does not match the expected schema—such as missing fields or incorrect data types—the provider rejects the proof. This rejection triggers a 402 error, effectively locking the user out until the format is corrected. Consult the official API documentation for the exact JSON structure required for proof submission.
Rate Limits and Quota Exhaustion
A 402 error frequently indicates that you have exceeded your monthly quota or credit balance. Unlike 429 Too Many Requests, which signals rate limiting, 402 means the resource itself is unpaid or unallocated. Check your billing dashboard to ensure your payment method is valid and that you have sufficient credits. If you are on a free tier, verify that you haven't accidentally triggered a paid feature without upgrading.
Validating Revenue and Usage
You’ve built the flow, but does it actually work under load? Monitoring your pay-per-api 402 guide implementation isn’t just about keeping the lights on—it’s about verifying that every request translates to valid revenue. Without real-time visibility into transaction success rates and API usage, you’re flying blind.
Start by tracking the ratio of successful 200 responses to 402 payment-required errors. A sudden spike in 402s might indicate a billing integration glitch rather than legitimate user churn. Use tools like the Coinbase Developer Platform dashboard to correlate payment confirmations with API calls. If a user pays but doesn’t get access, your conversion rate is lying.
Also, monitor request volume per endpoint. This helps you identify which features drive the most value and where you might be over-provisioning infrastructure. Set up alerts for unusual spikes or drops in traffic, as these often signal bot activity or broken client-side logic.
Before you launch, run through this quick validation checklist:
-
Verify payment webhooks trigger correct access grants
-
Confirm 402 errors return immediately upon credit exhaustion
-
Check that usage logs accurately reflect billed requests
-
Test error handling for failed blockchain confirmations
No comments yet. Be the first to share your thoughts!