What is HTTP 402 for API payments?
HTTP 402 is a reserved status code originally designed for payments, now revived for modern Web3 and agentic AI transactions. Unlike traditional subscription models, this code enables machine-to-machine micropayments directly within the request-response cycle.
In the context of Web3 infrastructure, 402 serves as a standardized signal that a resource is locked behind a payment wall. When an API endpoint returns a 402 status, it indicates that the request was valid but requires a financial transaction to proceed. This distinguishes it from 401 (Unauthorized) or 403 (Forbidden), which relate to identity and permissions rather than payment capability.
For developers building agentic AI systems, this status code provides a clean, protocol-level way to handle pay-per-use logic. Instead of complex middleware or external billing gateways for every call, the HTTP layer itself enforces the payment requirement. This aligns with the "official sources" approach to implementation, leveraging established web standards for new economic models.
Set up the payment gateway integration
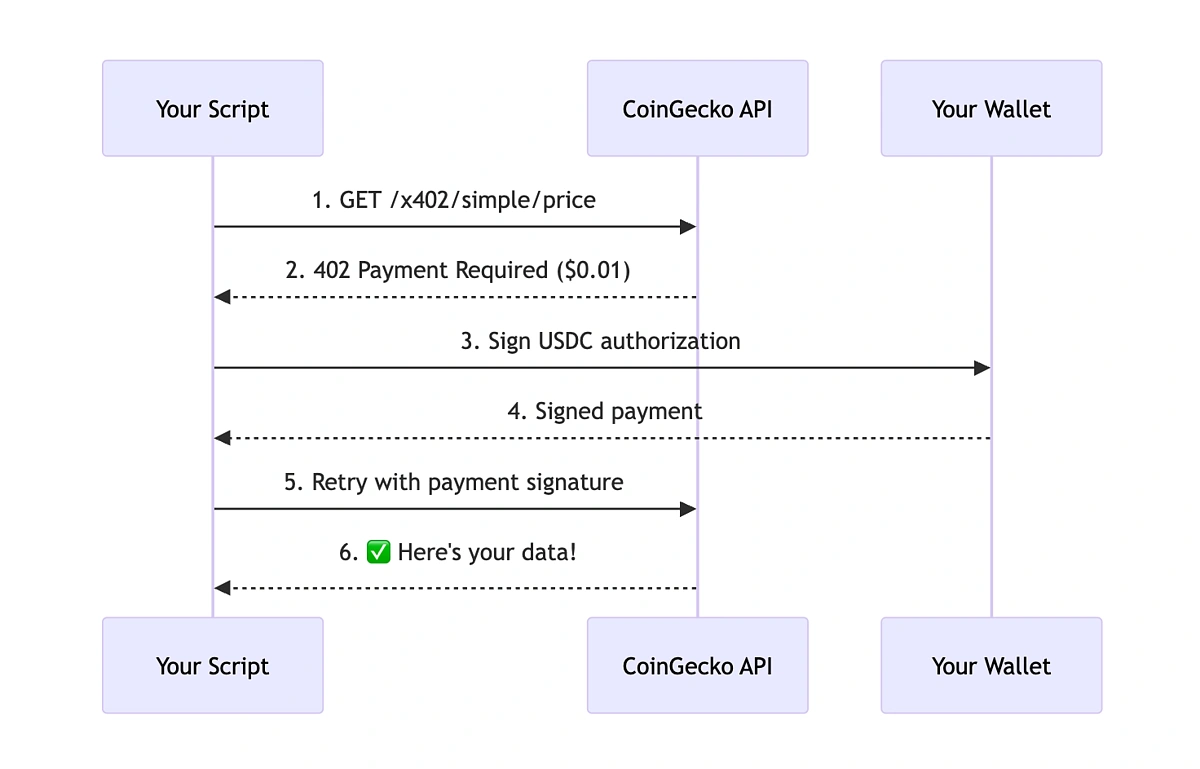
Configuring an API to accept cryptocurrency payments via HTTP 402 requires a shift from traditional key-based authentication to a payment-first workflow. Instead of validating a static API key, your server evaluates the request, determines the cost, and returns a 402 Payment Required status if no payment is detected. The client must then submit proof of payment to receive the 200 OK response and the actual data.
This pattern, often implemented using standards like x402, removes the need for complex subscription management or recurring billing infrastructure. You define priced endpoints, and the gateway handles the transaction logic. Below are the technical steps to configure this flow.
Handle wallet connections and transactions
To make Pay-Per-API 402 work, your backend must bridge the gap between a user's browser and the blockchain. This isn't just about sending a transaction; it's about verifying that the payment actually cleared before releasing the data. The process involves connecting the user's wallet, constructing a signed payment message, and confirming the on-chain state.
1. Connect the user's wallet
Start by integrating a wallet provider like MetaMask or WalletConnect. The goal here is simple: get the user's public address and ensure they are connected to the correct network (e.g., Ethereum Mainnet or a specific L2). You don't need to ask for permissions beyond signing messages.
Use standard libraries like ethers.js or viem to detect the wallet. If the user isn't connected, prompt them to connect. Keep this step frictionless; if you ask for a transaction signature too early, users will bounce. Just get the address.
2. Construct the payment payload
Once you have the address, your backend needs to tell the frontend exactly what to pay. This payload includes:
- The recipient address (your treasury or smart contract).
- The amount (in wei or the smallest unit of the token).
- A unique nonce or timestamp to prevent replay attacks.
- The specific API endpoint or resource being accessed.
Sign this payload using the user's wallet. This signature proves that the user authorized the payment. It’s a lightweight cryptographic proof that doesn’t require gas fees to verify on the backend, though the actual payment will.
3. Submit and confirm the transaction
The frontend broadcasts the signed transaction to the network. Now, you wait. Don’t assume success immediately. Block confirmations take time. Your backend should poll the transaction hash or listen for events from a node provider like Alchemy or Infura.
For most API calls, one or two confirmations are enough. If you’re using a high-throughput L2, finality is near-instant. If you’re on Mainnet, you might wait a minute. During this window, return a 402 Payment Required status to the frontend, showing a "Processing" state.
4. Verify and release access
Once the transaction is confirmed, your backend verifies the payment against the resource. Did the correct amount hit the right address? Did the nonce match? If yes, grant access.
Store a temporary record of this payment in a cache (like Redis) with a short TTL. If the user makes a follow-up request within that window, skip the payment step entirely. This reduces latency and cost for frequent callers. If the payment fails or is reverted, return a clear error message so the frontend can retry or show a funding prompt.
Avoid Common Integration Errors
Integrating Pay-Per-API (402) requires precision. A single misconfiguration in headers, timeouts, or signatures can break the payment flow entirely. Treat these checks as your final validation layer before going live.
Validate Header Structure
The Payment header is the core of the 402 protocol. Ensure your client constructs it exactly as specified. Common pitfalls include:
- Missing Currency Codes: Always include ISO 4217 codes (e.g.,
USD,BTC). - Malformed Signatures: Verify the signature matches the payload hash.
- Incorrect Content-Type: Use
application/payment-requestif specified.
Test with a mock server first. MDN’s documentation on HTTP authentication headers provides a solid baseline for structure validation.
Configure Timeouts Correctly
Payment verification takes longer than standard API calls. If your timeout is too short, you’ll get false negatives.
- Default Timeout: Set to at least 5-10 seconds.
- Retry Logic: Implement exponential backoff for transient failures.
- Circuit Breakers: Stop calling if the payment provider is down.
Hugging Face’s API documentation notes that payment-related errors often stem from timeout misconfigurations rather than actual payment failures.
Verify Signature Security
Never skip signature verification. A weak or missing check allows users to bypass payments.
- Use Standard Libraries: Don’t roll your own crypto.
- Validate Payload Integrity: Ensure the payload hasn’t been tampered with.
- Check Expiration: Reject expired payment tokens.
Use official SDKs for your language. They handle edge cases like clock skew and algorithm negotiation automatically.
-
Headers match spec exactly
-
Timeout set to 5s+
-
Signature verified with standard lib
-
Mock tests passed
Calculate costs and pricing models
Pricing tiers turn API access into a sustainable business model. You need to balance developer adoption with revenue generation. The goal is to structure costs so that high-volume users pay more while small teams can experiment for free.
Start by defining your cost base. Calculate the average cost per request, including server compute, database queries, and network egress. Add a margin for overhead and support. This baseline ensures you never lose money on a single API call.
Next, choose a pricing structure. Common models include transaction volume (per call), data volume (GB processed), or user-centric pricing (monthly active users). Each model serves different use cases. For example, high-frequency, low-data APIs benefit from per-request tiers, while data-heavy analytics APIs suit volume-based pricing.
| Pricing Model | Best For | Example |
|---|---|---|
| Per-Request | High-frequency, low-data APIs | Weather data, authentication |
| Data Volume | Heavy data transfer APIs | Video streaming, large datasets |
| User-Centric | SaaS-style integrations | CRM connectors, dashboards |
| Revenue Share | Marketplace APIs | Payment processing, booking engines |
Validate your pricing against competitors. Ensure your tiers are clear and predictable. Developers avoid hidden fees. Use a checklist to verify your final structure before launch.
-
Calculate cost per request including infrastructure
-
Define clear tier boundaries
-
Test pricing with beta users
-
Ensure billing system supports usage tracking
Frequently Asked Questions About 402 Payments
How do you calculate API pricing for 402 implementations?
Pricing models for HTTP 402 payments typically rely on four metrics: transaction volume, revenue or cost share, data volume (gigabytes sent or minutes processed), and user-centric billing based on active monthly unique users. For infrastructure engineers, the calculation must account for the latency overhead of on-chain or Lightning Network settlements to ensure the API call remains performant despite the payment step.
Is HTTP 402 supported by standard browsers and servers?
While HTTP 402 is a valid status code defined in RFC 7540, it is rarely implemented in default browser or server configurations. Most modern APIs simulate 402 behavior using custom headers or middleware that intercepts requests before they reach the application logic. You must explicitly configure your reverse proxy (like Nginx or Apache) or API gateway to recognize and process 402 responses for payment verification.
How does security work with Pay-Per-API 402?
Security in 402 implementations depends on verifying the payment signature before granting access to the resource. Unlike standard authentication tokens, 402 payments require a cryptographic proof of transaction completion. Use official protocol documentation to validate that the payment hash matches the requested endpoint, preventing replay attacks where a user reuses a single payment for multiple API calls.
No comments yet. Be the first to share your thoughts!