What is HTTP 402 Payment Required?
The HTTP 402 Payment Required status code is a reserved response code originally intended for digital cash systems. While the RFC 7231 specification explicitly marks it as "reserved for future use," modern Web3 infrastructure has reclaimed it to solve a specific problem: automated micropayments.
In the context of API monetization, 402 serves as a standardized handshake between a client and a server. When an API endpoint requires payment, it returns a 402 status instead of a generic 403 Forbidden. This signals to the client that access is blocked not due to authentication failure, but because a transaction is pending. The client—often an AI agent or a smart contract—processes the payment via a crypto wallet and retries the request.
This mechanism enables "pay-per-API" models without the friction of monthly subscriptions or complex API key management. It allows for granular billing where each request carries its own cost, making it ideal for high-volume, low-value data queries.
The primary advantage of 402 is its compatibility with existing HTTP client libraries. Developers do not need to build custom payment gateways for every endpoint; they simply configure their API gateway to return 402 for unpaid requests. This standardization reduces integration time and allows agents to handle payments autonomously using standard HTTP retry logic.
Set up the payment gateway
To implement pay-per-API 402, you need a payment provider that can intercept requests, verify payments, and grant access. This setup creates the financial transaction layer for your Web3 application. You can use specialized services like x402 or Lightning Network gateways to handle these micropayments without changing your core API logic.
The goal is to make the payment process invisible to the user while ensuring every request is accounted for. When a client hits your endpoint, the gateway checks for a valid payment. If none exists, it returns a 402 status code with payment instructions. Once paid, the client receives a token or proof that unlocks the resource.
Start by registering your API endpoint with your chosen payment provider. Services like x402 allow you to monetize an API in minutes. You simply input your endpoint URL, set your price per request, and share the new x402 URL with your clients. This step establishes the billing rules without requiring code changes to your existing infrastructure.
Choose your preferred payment method. For instant micropayments, Lightning Network is a common choice due to its low fees and speed. Alternatively, you can use stablecoins like USDC on Layer 2 networks. Ensure your provider supports the specific token or chain you intend to use. This configuration determines how funds are collected and settled.
Verify that your API correctly returns a 402 Payment Required status when no payment is detected. The response should include clear instructions on how to pay, such as a payment link or wallet address. Once you simulate a payment, ensure the provider issues a valid proof of payment that your API can validate to grant access.
Push your configuration to production. Monitor your dashboard for failed payments or unusual traffic patterns. Most providers offer real-time analytics to help you track revenue and usage. Adjust your pricing or limits as needed based on this data.
Configure API endpoints for 402
To implement a pay-per-API model, you need to change how your backend handles requests that lack payment proof. Instead of treating unpaid access as a security breach (401/403), you treat it as a billing issue. This requires modifying your middleware to intercept requests, check for valid payment credentials, and return an HTTP 402 status code when those credentials are missing or invalid.
This approach shifts the burden from authentication to authorization based on payment. By clearly defining the 402 response, you create a predictable experience for clients. They know exactly what is missing and how to fix it, which is essential for smooth API adoption in a pay-per-use model.
Handle payment verification and retries
Verifying a 402 payment requires synchronizing two distinct systems: the blockchain where the transaction occurs and your API gateway where access is granted. Because blockchain confirmations take time, you cannot grant access the moment a user clicks "pay." Instead, you must implement a verification loop that checks the transaction status before unlocking the resource.
1. Parse the payment instructions
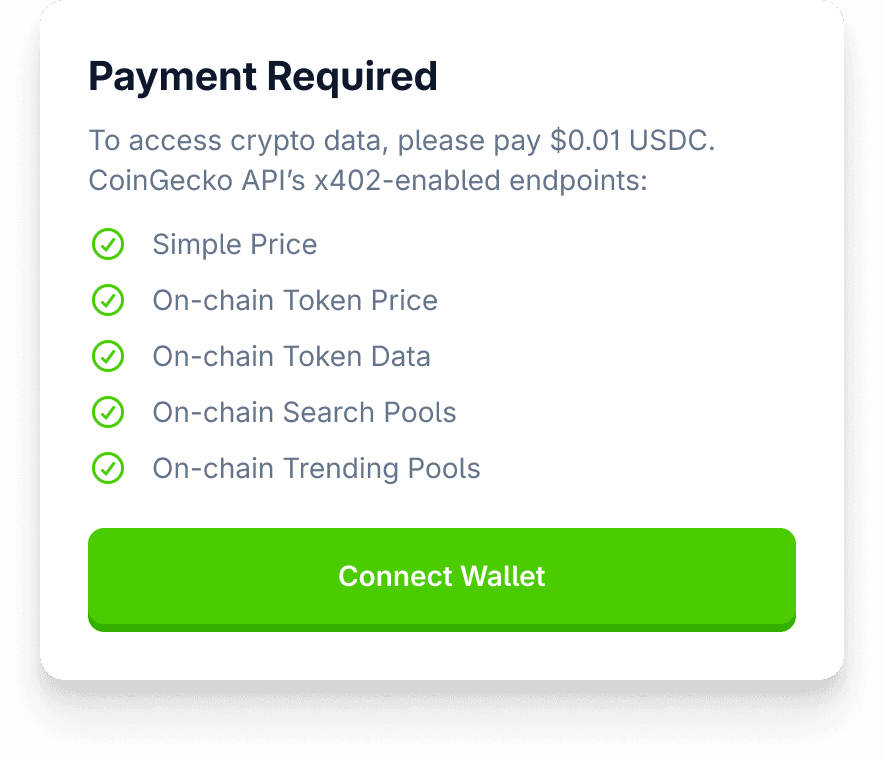
When your server returns a 402 Payment Required status, the response body must contain clear payment instructions. According to the x402 specification, this includes the destination wallet address, the exact amount in USDC, and a unique payment_id or invoice reference. This payment_id is critical—it links the blockchain transaction to your internal user session.
2. Submit the transaction
The client (or a wallet adapter) broadcasts the transaction to the network. At this stage, the transaction is "pending." Your system should return a loading state or a "waiting for confirmation" message to the user. Do not attempt to verify the payment yet, as the block explorer has not yet recorded it.
3. Verify on-chain confirmation
Once the transaction is submitted, your server-side worker must monitor the blockchain for the specific payment_id or transaction hash. Use an official blockchain explorer or indexer (like Etherscan or Alchemy) to check if the transaction is confirmed. For USDC on Ethereum, wait for at least one block confirmation to ensure the transaction is irreversible. If the transaction fails or is reverted, notify the client to retry.
4. Grant access and log the event
After confirming the payment is settled, update your database to mark the payment_id as successful. Then, issue a new API token or update the user's session to allow access to the previously blocked resource. Log this event for audit purposes, linking the user ID, the payment_id, and the transaction hash.
Your API returns a 402 status with a JSON body containing the wallet address, amount, and unique payment ID. This is the trigger for the client to initiate payment.
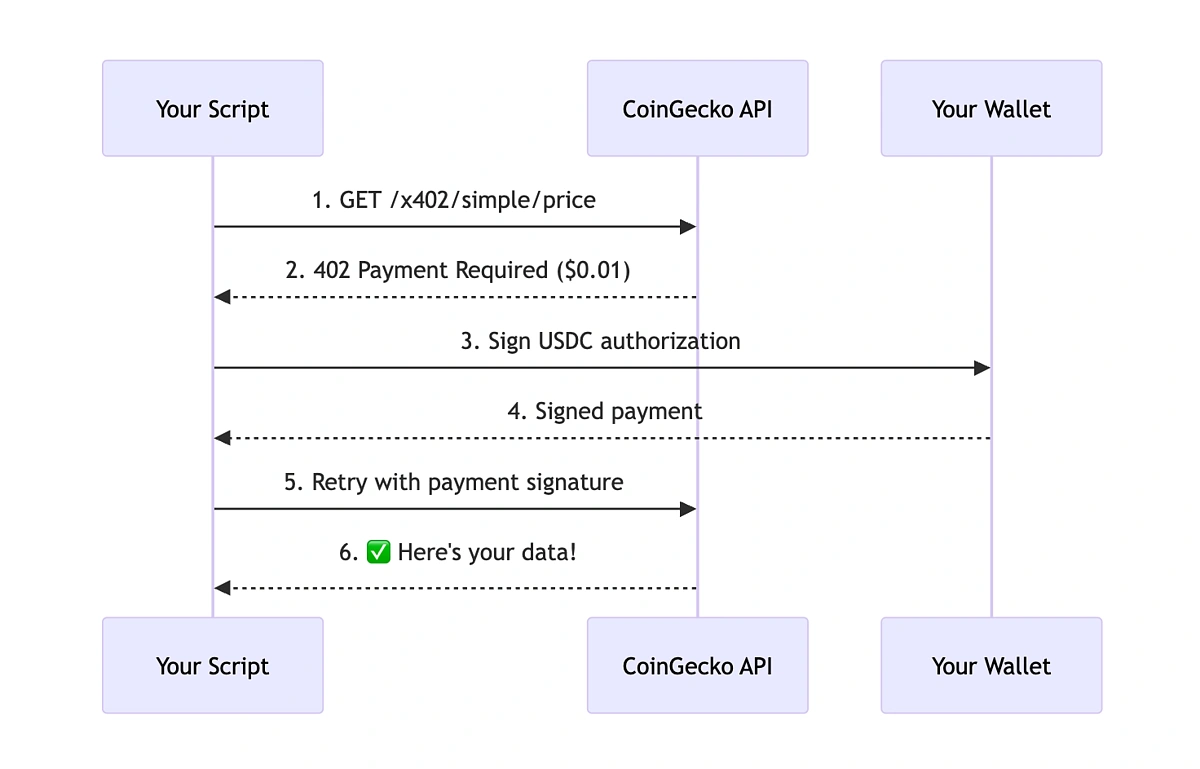
Your backend service polls a blockchain indexer for the transaction hash associated with the payment ID. Wait for the required number of confirmations before proceeding.
Once confirmed, update the user's access permissions in your database and log the transaction for accounting. Return a 200 OK on the next API request.
Handle failed transactions and retries
Not all transactions succeed. Network congestion, insufficient gas, or user cancellation can cause failures. If your verification step detects a failed transaction, do not simply block the user. Instead, return a clear error message indicating the failure and allow the client to retry with a new payment_id if necessary. For persistent failures, consider implementing a retry logic with exponential backoff on the server side to avoid overwhelming the blockchain indexer.
Common 402 integration errors
Even with a solid Web3 wallet setup, your API gateway can still throw a 402 Payment Required error. This usually happens because the payment signal isn't reaching the server correctly, or the server doesn't know how to process it. Here are the most frequent pitfalls and how to fix them.
Missing payment metadata in the request
The HTTP 402 status code is specifically reserved for payment requirements. If your API expects a transaction hash or a payment token, it must be included in the request headers or body. A common mistake is sending the API call without the necessary payment proof. Without this data, the server assumes the request is unpaid and returns 402. Ensure your client library attaches the payment signature or token to every request.
Incorrect status code handling
Developers often treat 402 like a standard 4xx client error (like 400 or 404) and retry the request immediately. This creates an infinite loop of failed requests. Instead, 402 should trigger a payment flow. Your frontend should intercept this status code and prompt the user to complete the transaction via their Web3 wallet. Only after the payment is confirmed should the request be retried.
Wallet connectivity and signature issues
A disconnected wallet or an expired signature can also lead to 402 errors. If the user’s wallet is disconnected, the payment token is missing. If the signature has expired, the server rejects it as invalid. Always check wallet connectivity before making API calls. Additionally, ensure your payment tokens have a reasonable validity period to avoid unnecessary user friction.
Server-side payment validation failures
Sometimes the issue lies on the server. If your payment validation logic is too strict or misconfigured, it might reject valid payments. Check your server logs for any validation errors. Ensure your payment gateway is correctly integrated and that the server can verify the transaction on the blockchain. A misconfigured validator is a silent killer of API integrations.
No comments yet. Be the first to share your thoughts!