What HTTP 402 means for API monetization
The HTTP 402 status code is officially reserved for future use, a relic from the original HTTP/1.0 specification that never saw widespread adoption. For years, developers ignored it, relying on Stripe or Shopify for standard payment flows instead. However, the rise of agentic web infrastructure has revived this code under the x402 protocol, turning a forgotten standard into the backbone of machine-to-machine micropayments.
For API monetization, this distinction is critical. When an agent encounters a 402 response, it doesn't just show an error page; it triggers a payment intent. This shifts the paradigm from human-clicked checkout flows to automated, programmatic transactions. Understanding this difference ensures you build infrastructure that correctly interprets payment requirements without confusing legacy systems.
To implement this effectively, follow the sequence below to handle 402 responses in your agentic workflows.
Implement the 402 Challenge-Response Loop
The core of a pay-per-API infrastructure is the handshake between your client and server. Unlike standard 401 (Unauthorized) or 403 (Forbidden) errors, HTTP 402 Payment Required signals that the resource is available but requires a specific transaction to unlock.
This section walks through the technical workflow for building this loop. We will cover the initial request, the server’s challenge response containing payment instructions, the client’s execution of the payment, and the final verification step.
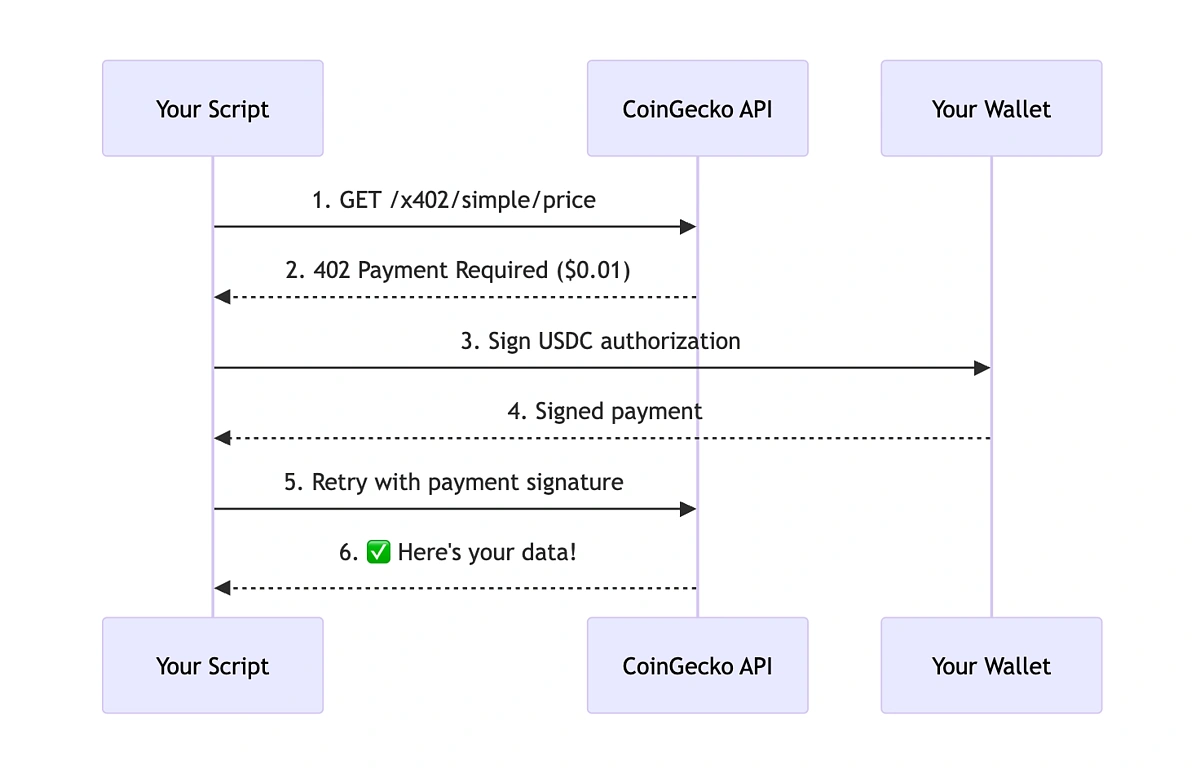
The client makes a standard HTTP GET or POST request to the protected endpoint. At this stage, no payment has been made. The server recognizes the request but does not return the data. Instead, it prepares a challenge response that includes the cost of the request and instructions on how to pay.
The server responds with an HTTP 402 status code. Crucially, the response body must contain the "challenge." This includes the amount due, the currency (typically USDC or stablecoins), the recipient wallet address, and a unique transaction ID or hash to prevent replay attacks. This step transforms the error into a payment instruction.
The client parses the 402 response to extract the payment details. It then constructs a blockchain transaction (e.g., on Ethereum or Polygon) sending the exact amount to the specified address. The client must wait for the transaction to be confirmed on-chain. This step requires robust error handling to manage network latency and gas fees.
The client sends the transaction hash back to the server, often in a new request or a callback. The server queries the blockchain to verify that the payment was received and matches the challenge parameters. Once verified, the server either returns the requested data immediately or issues a temporary token for subsequent requests.
Critical Implementation Details
When building this loop, precision is non-negotiable. The challenge response must be unique per request to prevent attackers from reusing old payment proofs. Additionally, always validate the transaction on-chain rather than relying on client-side confirmations, as these can be spoofed.
For a deeper technical dive into the x402 standard and how Laevitas implements this flow, refer to their API V2 documentation. This resource provides the exact schema for the 402 response payload.
Choose x402 compatible tools and libraries
Building an agentic payment infrastructure requires a stack that speaks the x402 protocol natively. Unlike traditional API gateways that rely on bearer tokens or subscription keys, x402 integrates payment verification directly into the HTTP request lifecycle. To implement this, you need to select tools that can generate wallets, handle micropayments, and validate the 402 status code without breaking existing logic.
Start by choosing an SDK that supports the specific blockchain network you intend to use. Nansen’s x402 implementation, for example, allows developers to bypass API keys entirely by requiring a direct crypto payment for each call [src-serp-6]. This approach simplifies integration for AI agents that need to pay for data access on the fly. Ensure your chosen SDK can handle the asynchronous nature of blockchain confirmations to prevent your agents from hanging while waiting for payment validation.
Next, select a wallet solution that your agents can manage programmatically. Since agents operate autonomously, they need a way to store funds and sign transactions securely. Look for libraries that support hardware wallet integration or secure enclave storage to protect private keys. The x402 GitHub repository provides an interactive demo where you can generate a wallet, fund it, and make a real payment against a live endpoint, which is a great way to test your setup before going live [src-serp-7].
Finally, integrate a gateway or middleware that intercepts outgoing requests and injects the payment signature. This component acts as the bridge between your application logic and the blockchain. It should automatically check for sufficient funds, execute the payment, and attach the proof to the HTTP request. Without this layer, your agents would need to handle complex crypto logic manually, which is error-prone and inefficient.


As an Amazon Associate, we may earn from qualifying purchases.
Troubleshoot common payment errors
When integrating Pay-Per-API logic, the 402 Payment Required status code is your primary signal, but it often masks underlying configuration issues. Developers frequently mistake quota limits for authentication failures or misinterpret HTTP status codes, leading to dropped transactions. To prevent these integration failures, follow this sequence to isolate and resolve the most common pitfalls.
| Error Code | Common Cause | Quick Fix |
|---|---|---|
| 402 Payment Required | Unpaid quota or expired subscription | Update payment method or top up credits |
| 401 Unauthorized | Invalid or expired API key | Regenerate key and refresh token |
| 429 Too Many Requests | Hit rate limit threshold | Implement exponential backoff |
| 500 Internal Server Error | Provider-side outage | Retry after 5 seconds with backoff |
Assess market viability and costs
Before building a pay-per-API system, you need to understand the unit economics. The model relies on micro-transactions, so your overhead must be lower than the value delivered. If gas fees eat your margin, the system fails.
Use this sequence to evaluate the financial feasibility of your specific use case:
The economic viability hinges on volume. Unlike traditional SaaS, where you sell access, you sell individual requests. This shifts your risk profile significantly. You are no longer worried about churn; you are worried about latency and failed transactions. Keep your pricing simple. Developers prefer predictable costs over complex tiered structures. If the cost per call is unclear, they will abandon the integration before it even starts.
No comments yet. Be the first to share your thoughts!