Why HTTP 402 matters for agents
The HTTP 402 status code was originally reserved for future use, but it has found a new purpose in the agentic web. While standard error codes like 400 or 403 handle mistakes, 402 handles commerce. It signals that a client must complete a payment before the server will fulfill a request. This makes it the ideal standard for machine-to-machine micropayments.
In a traditional API setup, authentication tokens or API keys grant access. In an agentic workflow, these tokens are often insufficient for granular billing. An agent might need to pay per call, per token, or per result. The 402 response provides a standardized way to say, "I can give you this data, but first, send the payment." This creates a trustless environment where resources are protected by cryptographic proof of payment rather than just access control lists.
This shift is critical for the pay-per-API 402 guide because it moves beyond simple subscription models. It allows for dynamic pricing where the cost of an API call can fluctuate based on demand, complexity, or real-time value. For developers building infrastructure for agentic payments, understanding the mechanics of HTTP 402 is the first step toward building a scalable, automated economy.
Set up the x402 payment gateway
To implement a pay-per-api 402 guide strategy, you need to intercept outgoing requests and inject a payment layer. The x402 protocol standardizes this by embedding pricing data directly into the HTTP 402 response. This allows AI agents to see the cost before they commit funds, creating a transparent billing loop.
The following steps walk you through configuring a middleware layer that handles these payments. We will focus on a Node.js environment, as it is the most common runtime for agentic workflows, but the logic applies to Python or Go as well.
Start by adding the x402 library to your project. This package provides the core functions to detect payment requirements and handle the crypto transaction. Run npm install x402 in your terminal to pull the dependencies. This ensures your API can speak the standard language of agentic payments.
Before serving data, you must define how much you charge per request. In your middleware configuration, set your wallet address and the unit price for your API calls. The x402 protocol requires the current price to be included in every 402 response, so your agent sees the updated cost before paying. You can also set a minimum threshold or maximum transaction limit to prevent spam.
Create a middleware function that wraps your existing API routes. When an unauthenticated request hits your endpoint, the middleware should check for a valid payment signature. If none is found, it returns an HTTP 402 status code with the current price and wallet address in the body. This is the core of the pay-per-api 402 guide implementation.
Use a simple script or an AI agent framework to simulate a request. The agent should receive the 402 response, parse the price, send the crypto payment to your wallet, and then retry the request with the payment proof in the headers. Verify that your API accepts the proof and returns the actual data. This confirms your gateway is working correctly.
This setup creates a robust foundation for monetizing your API. By following these steps, you ensure that every request is backed by a verified payment, allowing you to scale your agentic services without manual billing overhead.
Compare pricing models and tools
Choosing an infrastructure provider comes down to how you want to bill your agents. Traditional API gateways rely on pay-per-request models, while x402-native tools enable direct, on-chain micropayments. Understanding the trade-offs helps you pick the right stack for your agentic workflows.
x402 vs. Traditional API Pricing
Traditional pay-per-request pricing charges a fixed fee for each API call. It is simple to calculate but often inefficient for agents making hundreds of small requests. x402 flips this by tying access directly to payment, allowing for granular, real-time billing without complex middleware.
| Feature | Traditional Pay-Per-Request | x402 Pay-Per-Call |
|---|---|---|
| Billing Model | Fixed cost per request | Microtransaction per call |
| Latency | Low (standard HTTP) | Slightly higher (payment check) |
| Agent Compatibility | Requires API key management | Native wallet integration |
| Billing Infrastructure | Complex (Stripe, etc.) | Built into the protocol |
| Use Case | High-volume, predictable traffic | Sporadic, fine-grained agent tasks |
Traditional models work well for predictable, high-volume traffic where billing overhead is amortized. However, for agentic workflows that make sporadic, fine-grained requests, x402 reduces friction by eliminating the need for separate billing infrastructure. Each call becomes a self-contained transaction, making it easier to track costs at the agent level.
Recommended Tools
To get started with x402, you will need tools that support wallet integration and on-chain payment verification. Here are some essential resources for building your infrastructure:


As an Amazon Associate, we may earn from qualifying purchases.
These tools help you manage the hardware and development environment needed for secure, efficient agentic payment integration. Focus on hardware that supports secure key storage, as your agents will need to manage private keys for autonomous transactions.
Fix common integration errors
Even with a solid pay-per-api 402 guide strategy, integration hiccups can stall your agentic payments. The two most frequent culprits are caching layers and wallet connection failures. Here is how to fix them.
Stop caching 402 responses
Caching is a performance staple, but it becomes a liability when a 402 Payment Required response is stored. If an agent or browser caches a 402, it may refuse to retry the payment flow, trapping the user in a loop. The HTTP specification reserves 402 for future use, meaning most caches treat it like any other client error rather than a dynamic billing state.
To prevent this, ensure your CDN and browser headers explicitly mark 402 responses as no-store or no-cache. This forces the next request to hit your payment gateway, allowing the agent to trigger the wallet signature again. Think of the 402 response as a temporary hold, not a permanent denial of service.
Handle wallet connection failures
Agentic workflows often rely on automated wallet connections, which can fail due to network congestion or expired signatures. When a wallet connection drops mid-request, the API returns a 402 because the payment token is invalid or missing. Instead of a generic error, provide a clear signal that the wallet needs re-authentication.
Implement a retry mechanism with exponential backoff for connection errors. If the wallet signature fails twice, prompt the user (or agent) to refresh the connection. This reduces friction and ensures the payment flow completes without manual intervention. For more on API pricing models that impact these flows, see the Moesif API pricing guide.
Verify payment settlement flow
Before you expose your pay-per-api 402 guide implementation to production, you need to confirm that the handshake between the agent, the wallet, and the API server works without friction. A broken settlement flow means lost revenue or, worse, free usage.
Step 1: Confirm the 402 response structure
Your API must return a 402 Payment Required status code with the price embedded in the headers or body. According to the x402 protocol, the agent needs to see the current price before initiating payment. Test this by sending a request without a signature and verifying the response includes the expected pricing metadata.
Use a tool like Postman or curl to send a request. Ensure the status is 402 and the x-402-price header (or equivalent) contains the correct amount. If the agent receives a 200 OK without payment, your pay-per-api 402 guide setup is too permissive.
Step 2: Simulate the agent payment
Next, mimic the agent's behavior. Use a test wallet to sign a transaction for the exact amount specified in the 402 response. Send this signature back to your API. The server should validate the signature against the public key and the transaction hash on the blockchain. This step ensures your validation logic correctly interprets on-chain events.
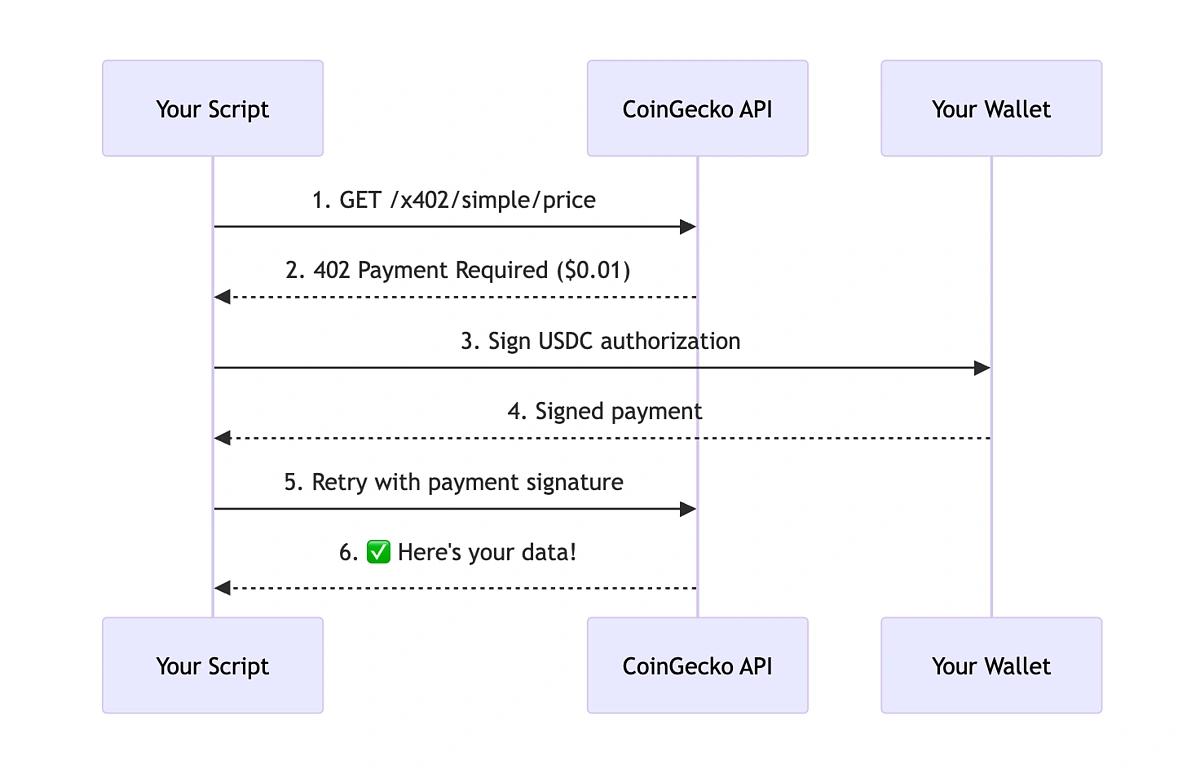
Write a script that constructs the payment payload. If your backend rejects a valid signature, check your gas limit assumptions or blockchain RPC node health. The agent must successfully prove payment before the API unlocks the resource.
Step 3: Verify resource unlocking
The final check is ensuring the API actually delivers the service after payment. Repeat the initial request, this time including the valid payment signature. The server should process the request and return the full 200 OK response with the expected data. If the resource remains locked, your settlement webhook or listener might be failing to update the access state.
-
402 response includes accurate price
-
Signature validation passes on testnet
-
Resource unlocks after successful payment
-
Rate limits apply correctly post-payment
No comments yet. Be the first to share your thoughts!