What is the x402 payment protocol
HTTP 402 is a reserved status code that has sat dormant in the protocol specification for decades, waiting for the right moment to become useful. The x402 payment protocol, developed by Coinbase, finally activates this code for the modern web. It enables machines to negotiate and settle payments in stablecoins directly over standard HTTP requests, turning every API endpoint into a potential micro-transaction point.
Unlike legacy billing systems that require separate accounts, subscriptions, or complex checkout flows, x402 integrates payment verification into the API response itself. When an API endpoint requires payment, it returns a 402 status code along with a cryptographic proof of payment. This allows autonomous agents and scripts to pay for access instantly without human intervention, a critical requirement for the emerging agentic web.
The protocol leverages the Coinbase Developer Platform (CDP) to handle the underlying blockchain transactions. By abstracting away the complexity of wallet management and gas fees, x402 allows developers to focus on the value of their data or service rather than the mechanics of collecting it. This creates a seamless bridge between traditional web infrastructure and decentralized finance, enabling new business models that were previously too cumbersome to implement.
For developers, this means a shift in how they design API security. Instead of relying solely on API keys or tokens, you can enforce payment as a gatekeeping mechanism. The client must provide proof of a stablecoin transfer before receiving the requested data or service, ensuring that every request has a corresponding economic value attached to it.
Set up the x402 payment flow
Integrating x402 requires shifting your API’s response logic to handle payment requirements before granting access. The flow relies on the standard HTTP 402 status code, repurposed to signal that a request needs payment to proceed. This creates a predictable request-response cycle between the client and server.
Identify which API routes require payment. Configure your server to attach a price to these endpoints. When a client requests a resource, the server checks if the endpoint is protected. If it is, the server prepares a response that includes the payment amount and instructions rather than the data itself.
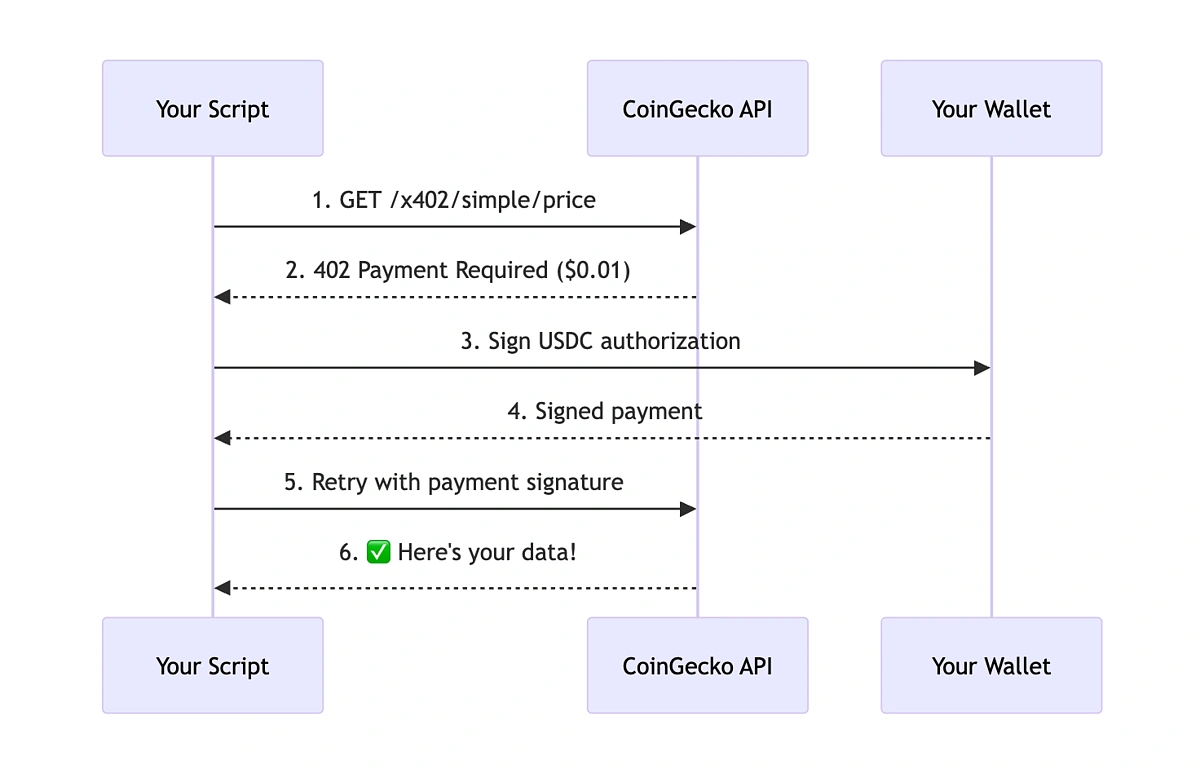
The server responds with a 402 Payment Required status code. This response must include the specific payment details the client needs to complete the transaction. Typically, this involves providing a wallet address, the exact amount in USDC, and a unique transaction reference or payload that links the payment to the requested API call.
The client receives the 402 response and initiates the payment. Using the provided instructions, the client constructs a transaction, signs it with their private key, and broadcasts it to the blockchain. The client then captures the transaction hash or proof of payment to send back to the server.
The client sends the payment proof back to the server. The server verifies the transaction on-chain to ensure the correct amount was sent to the correct address. Once verified, the server grants access to the requested data, often by returning a token or directly serving the API response for that specific request.
This workflow ensures that payment is settled before data is delivered. By using the standard HTTP 402 code, you maintain compatibility with existing HTTP clients while adding a layer of monetization. The key is to keep the payment instructions clear and the verification process automated.
Choose your infrastructure and tools
You need a stack that handles USDC payments, verifies tokens, and returns the correct HTTP 402 status. The landscape splits into the official reference implementation, specialized API gateways, and search-first infrastructure.
Coinbase x402 Reference Implementation
Coinbase’s x402 is the open-source standard for this protocol. It provides the core libraries to sign and verify payment tokens. Use this if you want full control over your payment logic and already have a backend that can handle USDC transfers. It is the baseline for understanding how the protocol works under the hood.
Abstract API Gateway
Abstract offers a managed layer that integrates x402 directly into their API infrastructure. This option is ideal if you want to avoid writing custom payment verification code. They handle the token validation and routing, letting you focus on your API endpoints. It is a faster path to production for teams without dedicated blockchain engineering resources.
Exa Infrastructure
Exa provides a search-centric approach to x402, focusing on discoverability and integration with existing data pipelines. Their documentation outlines how to implement x402 for search APIs specifically. This is a strong choice if your primary product is data retrieval and you want to monetize access through standardized payment flows.
Comparison of Options
| Feature | Coinbase x402 | Abstract API | Exa Infrastructure |
|---|---|---|---|
| Type | Open-source library | Managed API Gateway | Search-focused infrastructure |
| Control Level | High (self-hosted) | Medium (managed) | Medium (managed) |
| Best For | Custom backend logic | Rapid API deployment | Search data monetization |
| Verification | Manual/Custom | Automated | Automated |
Developer Hardware
Building and testing x402 integrations requires reliable development environments. Consider these tools to streamline your workflow.


As an Amazon Associate, we may earn from qualifying purchases.
Fix common x402 integration errors
Even with a working x402 implementation, specific pitfalls can break your API’s payment flow. The most frequent issues involve signature verification failures and network latency during transaction confirmation. Addressing these early prevents revenue loss and ensures your agents can pay reliably.
Signature verification failures
The most common integration error occurs when the server rejects a valid x402 signature. This usually happens because the server’s public key does not match the one used to sign the request, or the signature format is slightly malformed. Ensure your server validates the signature against the correct public key derived from the agent’s wallet address. If you are using a library like @base-org/x402, verify that the version matches your server-side verification logic. A mismatch in cryptographic libraries often leads to silent failures where the signature looks correct but fails validation.
Network latency and confirmation delays
x402 relies on on-chain transactions, which introduces latency. If your API expects immediate confirmation, it may reject requests while the transaction is still pending. To handle this, implement a polling mechanism or use webhook listeners to detect when the transaction is confirmed on the blockchain. Do not rely solely on the initial transaction hash; wait for the required number of block confirmations defined by your security policy. This is especially critical on networks with variable block times.
Payment API generic failures
Some payment APIs use the 402 status code as a generic catch-all for failed payment requests. If your API returns a 402 without a clear error message, debugging becomes difficult. Always include a detailed error code and message in the 402 response body. This helps developers understand whether the failure was due to insufficient funds, an invalid signature, or a network issue. Clear error reporting is essential for troubleshooting integration problems quickly.
Checklist for integration testing
-
Verify server public key matches agent wallet address
-
Test signature validation with malformed and valid signatures
-
Implement transaction confirmation polling or webhooks
-
Ensure 402 responses include detailed error messages
-
Test on testnet before deploying to mainnet
Verify payments and grant access
Once the client submits the Paywalled-Proof header, the server must validate the transaction before returning data. This step ensures that the stablecoin payment was actually received and confirmed on-chain. Without this verification, the API remains unprotected against replay attacks or unconfirmed transactions.
Extract the transaction hash from the Paywalled-Proof header. Use an on-chain explorer or indexer to verify the transaction exists and has reached the required number of confirmations. This confirms the payment is final and irreversible.
Check that the transaction was sent to your specific API wallet address. x402 payments are directed to the wallet specified in the Paywalled-Proof header. Ensure the amount matches the price defined in your API’s pricing model.
If the transaction is valid, generate a session token or update the user’s access status. Return the requested API data immediately. If the transaction is invalid or missing, return a 402 Payment Required status with instructions on how to pay.
A quick pre-flight checklist for production deployment:
- Signature validation: Ensure headers are properly formatted.
- Idempotency keys: Prevent duplicate charges for the same request.
- Error handling: Gracefully manage network timeouts or indexer failures.
For more details on setting up the x402 protocol, refer to the Coinbase Developer Documentation.
No comments yet. Be the first to share your thoughts!