What is the x402 payment standard
x402 is an open payment standard that operationalizes the HTTP 402 status code for machine-to-machine micropayments. It allows AI agents and software clients to pay for API access on a per-request basis using USDC stablecoins, removing the friction of subscriptions and manual billing.
Historically, the HTTP 402 Payment Required status code was defined in RFC 7231 as a nonstandard response reserved for future use src-serp-2. For decades, it sat dormant, occasionally surfacing as a billing error in legacy systems but never seeing widespread adoption as a protocol.
x402 changes this by turning the 402 status code into a structured payment instruction. Instead of a generic error, the response includes a payment request that the client agent can automatically settle. This enables true pay-per-use models where AI agents can autonomously purchase tokens, data, or compute power without human intervention src-serp-5.
This approach distinguishes x402 from legacy billing errors. While traditional 402s often indicate a failed transaction or subscription lapse, x402 is a proactive mechanism for initiating micro-transactions. It transforms the HTTP protocol into a payment rail, allowing software to negotiate and settle payments in real-time.
Set up the payment gateway infrastructure
To implement a Pay-Per-API 402 guide effectively, you need a backend that acts as both a service provider and a payment processor. Instead of relying on traditional payment gateways, the x402 protocol allows your API to return an HTTP 402 status code with embedded payment instructions. This approach lets AI agents and clients pay directly in cryptocurrency—typically stablecoins like USDC—without leaving your server infrastructure.
The setup involves configuring your API endpoints to detect unpaid requests and respond with the necessary blockchain transaction data. Below is the step-by-step process to build this infrastructure.
By following these steps, you create a robust infrastructure for monetizing your API. The key is keeping the payment logic simple and relying on the transparency of the blockchain for verification. This setup reduces friction for users and opens up new revenue streams for your services.
Integrate agents with x402 clients
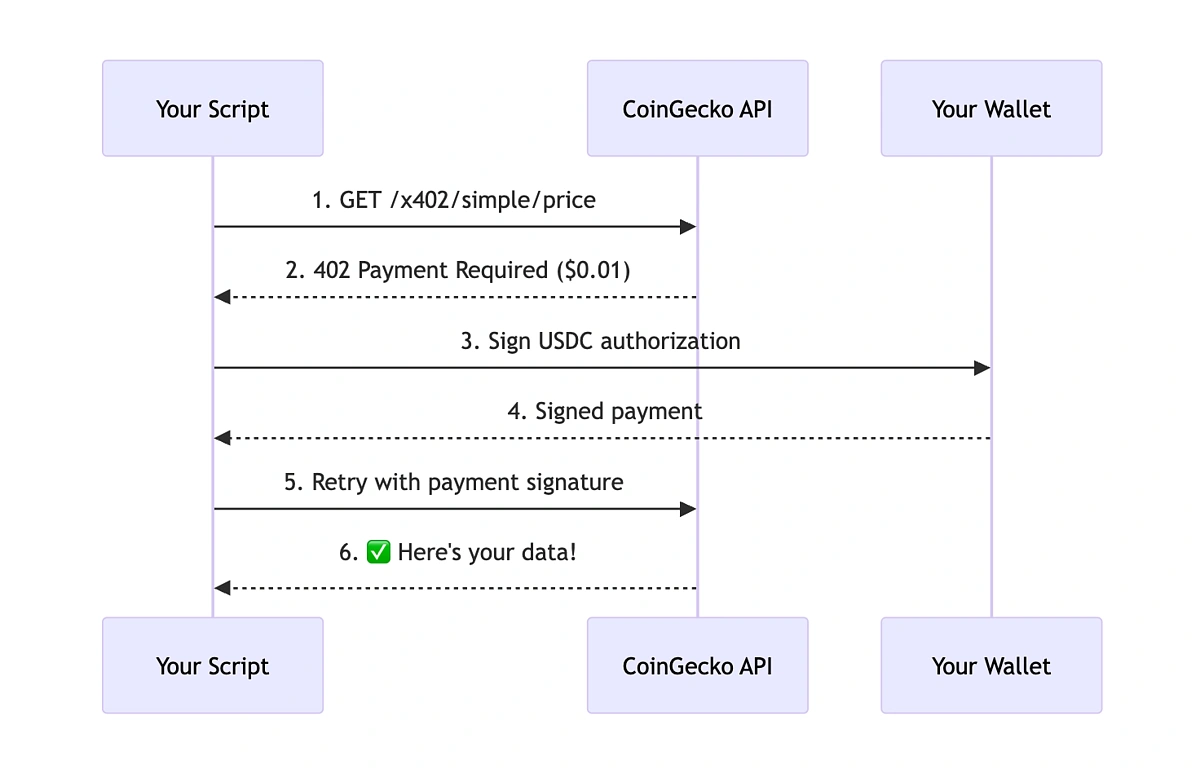
Integrating AI agents with x402 clients transforms how models access data. Instead of manual API keys or static subscriptions, agents handle payments automatically. This process relies on a specific sequence: the agent sends a request, receives a 402 response, executes a payment, and retries to access the content.
The standard is built on the HTTP 402 Payment Required status code. When an agent encounters this response, it triggers a payment workflow. The agent then uses the payment proof to retry the request. This cycle allows for precise, per-request billing.
This workflow ensures that agents only pay for what they use. It removes the need for pre-funded accounts or complex subscription management. The process is transparent and verifiable on-chain.
Handle common integration errors
When integrating x402 for AI agents, the HTTP 402 status code often triggers confusion. Unlike 401 (unauthorized) or 403 (forbidden), 402 signals that payment is required to access the resource. Clients frequently misinterpret this as a permission failure or fail to parse the payment instructions embedded in the response headers. This section outlines how to debug these scenarios and ensure your agent can complete transactions smoothly.
Debugging payment instruction parsing
AI agents must be configured to recognize 402 as a transactional signal, not an error state. If the agent stops execution upon receiving 402, it will never attempt payment. Ensure your client library is set to handle 402 responses by extracting payment details from the Pay header or response body, as defined in the x402 specification. If parsing fails, log the raw response headers to verify the structure matches the expected format.
Distinguishing 402 from 401/403
Many developers assume 402 is a security block. It is not. A 401 error means the client lacks valid credentials, while 403 means the credentials are valid but lack scope. A 402 error means the credentials are valid, but the resource requires a fee. To fix this, verify that your agent is sending the correct API key or session token in the request headers. If the token is valid but the payment is missing, the 402 is correct. If the token is invalid, the server should return 401, not 402.
Handling network and proxy interference
Some intermediaries, such as corporate firewalls or outdated CDNs, may block 402 responses because they are not standard HTTP codes for general web traffic. If your agent receives a timeout or a generic 502 error instead of 402, the request may be dropped before reaching the payment gateway. Test your integration using a direct connection or a proxy that allows 402 status codes. If necessary, configure your agent to retry with a different endpoint or fallback payment method.
Evaluate market research and costs
Before launching a pay-per-API 402 implementation, you need to understand the economic friction. While the HTTP 402 status code is the signal, the actual transaction happens on-chain. This means you are dealing with gas fees, stablecoin volatility, and network congestion. If your API call costs $0.01 but the gas fee is $0.50, the model breaks.
Use this checklist to assess your cost structure before writing code.
-
Estimate per-request gas costs on your target chain (e.g., Base, Ethereum L2)
-
Model stablecoin volatility impact on micro-transactions (USDC vs. DAI)
-
Calculate minimum viable transaction threshold to avoid dust attacks
-
Review market adoption trends for 2026 (Base, Exa, AbstractAPI)
1. Analyze Gas and Network Costs
Gas fees are the silent killer of micropayments. On Ethereum mainnet, a single transaction can cost more than the API fee itself. This is why most modern x402 implementations use Layer 2 solutions like Base or Arbitrum. These networks offer sub-penny transaction fees, making $0.001 payments economically viable. You must test your specific smart contract on the testnet first to get accurate gas estimates.
2. Account for Stablecoin Volatility
Even stablecoins fluctuate. If you accept USDC, a 0.1% drop in value during the transaction window can eat your margin. For high-frequency AI agent interactions, this volatility adds up. Consider using a stablecoin with a tighter peg or implementing a dynamic pricing mechanism that adjusts the API fee based on the current exchange rate. This ensures you receive the intended value regardless of minor market shifts.
3. Benchmark Against Market Trends
The landscape is shifting rapidly. Companies like AbstractAPI are pioneering HTTP 402 as a standard for Bitcoin Lightning micropayments, while others leverage Base for its developer-friendly infrastructure. By 2026, expect a consolidation around L2s that offer the best balance of speed and cost. Researching these trends now helps you avoid building on a chain that will be obsolete in two years.
4. Compare Implementation Options
Choosing the right infrastructure depends on your volume and technical stack. The table below compares the most common approaches for integrating pay-per-API 402.
| Option | Avg. Cost | Speed | Best For |
|---|---|---|---|
| Ethereum Mainnet | $1–$10+ | Slow | High-value, low-frequency |
| Base (L2) | <$0.01 | Fast | AI agents & micropayments |
| Bitcoin Lightning | Negligible | Instant | Real-time streaming |
| Solana | ~$0.00025 | Very Fast | High-volume data |
Pre-launch checklist for x402 APIs
Before exposing your API to agentic clients, ensure the implementation aligns with the x402 standard. This checklist covers the critical path from security to monitoring, ensuring your service is ready for automated, per-request billing.
Frequently asked questions about 402
This section addresses common implementation hurdles and error resolution steps for the HTTP 402 Payment Required status code.
No comments yet. Be the first to share your thoughts!