How x402 enables pay-per-request access
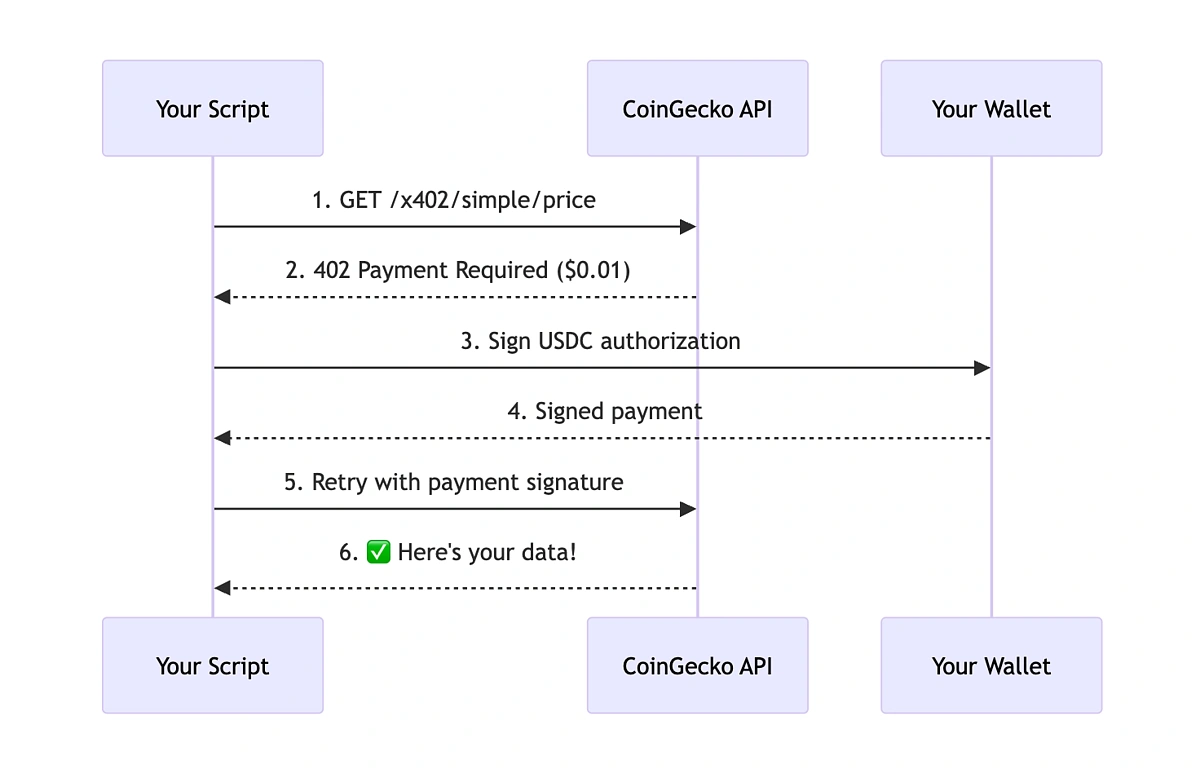
The x402 protocol replaces the traditional API key with a cryptographic payment request. Instead of managing static tokens or subscribing to monthly plans, your code interacts directly with an HTTP 402 "Payment Required" response. This status code signals that the server needs payment before serving the data, allowing any cryptocurrency wallet to settle the fee instantly.
This shift transforms API access from a gatekeeping model to a utility model. When you send a request to an endpoint like those on Elfa or Nansen, the server checks your wallet balance. If the balance covers the fee, the data is returned. If not, the 402 response triggers your client to initiate the payment. This eliminates the friction of onboarding, reducing setup time from hours to minutes.
For developers, this means your integration logic becomes simpler. You no longer need to store secret keys in environment variables or rotate them for security. The "key" is simply your wallet's ability to sign and send a transaction. This is particularly useful for agentic workflows where automated systems need to purchase data on the fly without human intervention.
Integrate x402 into your API workflow
Implementing the x402 payment flow is less about complex infrastructure and more about handling a specific HTTP status code. The protocol relies on the standard 402 Payment Required response to gate access. When a user calls an endpoint without payment, the server doesn't just reject the request; it returns instructions on how to pay. This turns every API call into a potential transaction.
1. Set up the payment gateway
Before writing any API logic, you need a wallet that can receive and track payments. Most developers use a provider like Elfa or a custom smart contract on a low-fee chain like Solana or Base. The goal here is simplicity: you want a wallet address that can instantly receive USDC or ETH. Test this by sending a small amount from a test wallet to ensure the funds arrive in your destination wallet. This is your "cash register" for the API.
2. Define priced endpoints
Not every endpoint needs a paywall. Identify the high-value data or compute-heavy functions that should trigger a payment. For each of these routes, define a price in your preferred currency (usually stablecoins like USDC). In your server code, these endpoints should be configured to check for a valid payment proof before returning data. If the proof is missing or invalid, the server must be ready to return a 402 status code with a payment payload.
3. Return the 402 Payment Required response
This is the core of the x402 protocol. When an unauthorized request hits a priced endpoint, your server should respond with:
- Status Code:
402 Payment Required - Headers: Include
x-payment-amount(the cost) andx-payment-address(your wallet). - Body: A JSON object containing the payment instructions. This typically includes the amount, the currency, the recipient address, and a unique
paymentIdorinvoiceIdto link the payment to the specific request.
This response acts as an invoice. It tells the client exactly what to pay and to whom. The client then signs a transaction and sends the payment proof back to you.
4. Verify the payment proof
Once the client receives the 402 response, they sign a transaction sending the required amount to your wallet. They then generate a cryptographic proof (often a signed message or a transaction hash) and send it back to your API in a follow-up request. Your server must verify this proof. Check the blockchain to ensure the transaction exists, the amount is correct, and the recipient is your wallet. If the proof is valid, grant access to the data.
5. Return the requested data
After successful verification, return the data as you normally would. To improve the user experience, you can cache the payment proof for a short period. This allows the client to make subsequent requests without re-verifying the payment every single time, reducing latency and blockchain fees. Once the cache expires, the 402 flow triggers again, ensuring continuous payment for ongoing access.
Create a wallet capable of receiving your chosen currency (e.g., USDC on Solana). Test with a small transfer to ensure funds are tracked correctly.
Identify high-value routes. Configure your server to check for payment proofs on these specific paths.
If no proof is present, respond with 402 Payment Required. Include the amount, address, and a unique invoice ID in the JSON body.
When the client resubmits the request with a transaction hash or signed message, verify the blockchain transaction matches the invoice details.
Return the requested data. Cache the valid proof for a set duration to allow frictionless subsequent requests.
Choose the right stablecoin for payments
x402 payments settle on-chain, which means the currency you select impacts both transaction costs and price stability. While the protocol accepts various ERC-20 tokens, USDC is the standard for API fees because it minimizes the risk of value fluctuation between the time you authorize the payment and when the server validates it.
When selecting a stablecoin, prioritize assets with deep liquidity on the network you are using. If you pay in a volatile stablecoin, a sudden dip in value could cause your payment to be rejected as insufficient. USDC is widely supported by x402 providers and integrates cleanly with most wallet infrastructure, reducing the friction of integration. Below is a comparison of the most common stablecoins used in x402 implementations. This table highlights the factors that matter most for API billing: network support, volatility risk, and provider compatibility.
| Stablecoin | Primary Networks | Volatility Risk | x402 Support |
|---|---|---|---|
| USDC | Ethereum, Polygon, Solana | Low | Widely Adopted |
| USDT | Ethereum, Tron, BSC | Low | Common |
| DAI | Ethereum, Arbitrum | Medium | Limited |
| FRAX | Ethereum, Fantom | Medium | Niche |
For most developers, sticking to USDC is the safest path. It ensures that your API budget calculations remain accurate and that your payments are accepted by the widest range of x402-enabled endpoints. Always verify the specific token requirements in the API documentation before initiating a transaction.
Optimize costs for market research queries
Market research often requires scanning dozens of data points before you know if a project is viable. With traditional subscriptions, you pay for the entire bucket of data regardless of whether you use it. This flat-fee model creates overhead, especially when you are only interested in a small fraction of the available endpoints.
Pay-per-API 402 changes that dynamic. Instead of a monthly bill, you pay only when you make a successful request. This is particularly useful for high-volume but sporadic queries, such as checking token metrics or analyzing market trends for a specific sector.
To keep costs down, structure your research workflow to batch requests logically. Instead of making individual calls for every minor data point, group related queries into single API calls where possible. This reduces the number of transactions and the associated gas fees on the blockchain.
You can also implement a local cache for frequently accessed data. By storing results locally for a short period, you avoid re-fetching the same information multiple times. This simple step can significantly reduce your total spend on data access.
Fix common x402 integration errors
Pay-Per-API 402 troubleshooting should start with a clear boundary: what is actually broken, and what still works normally. Check the display, network connection, paired devices, app access, and recent updates before assuming the whole system needs a reset. A small connection failure can make the main screen feel unreliable even when the core system is fine. Work from low-risk checks to deeper resets. Confirm power state, safe parking, account access, and signal first. Then restart the interface, wait for it to reload completely, and test the original symptom. Avoid changing multiple settings at once because that makes it harder to know which step actually fixed the problem. If the issue affects safety information, repeats after every restart, or appears with warning messages, treat the reset as a temporary diagnostic step rather than the final fix. Document the symptom and move to official support instead of stacking more DIY attempts.
The simplest way to use this section is to keep the setup small, verify each change, and record the stable configuration before adding optional accessories.
Verify your x402 payment setup
Pay-Per-API 402 works best as a sequence, not a scramble through settings. Do the minimum first: confirm compatibility, connect the core hardware, update only when needed, and test the result before adding optional features. That order keeps the task understandable and makes failures easier to isolate. After each step, pause long enough for the interface to finish syncing. Many setup problems are timing problems disguised as configuration problems. If the same step fails twice, record the exact error, restart the smallest affected piece, and retry before moving deeper.
The simplest way to use this section is to keep the setup small, verify each change, and record the stable configuration before adding optional accessories.
No comments yet. Be the first to share your thoughts!